时间:2021-07-01 10:21:17 帮助过:13人阅读
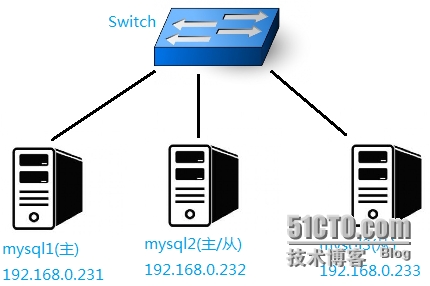
在Mysql1新建同步用户和新建一个数据库yfshare,在数据库里面新建表插入数据,以作标记:
mysql> select * from mytable;
+------+------+------------+
| name | sex  | brithday   |
+------+------+------------+
| aaa  | 1    | 1993-08-15 |
+------+------+------------+
1 row in set (0.00 sec)
mysql> flush privileges;
Query OK, 0 rows affected (0.00 sec)
mysql> CREATE USER aaa@192.168.0.232 IDENTIFIED BY ‘redhat‘;
Query OK, 0 rows affected (0.00 sec)
mysql> GRANT REPLICATION SLAVE ON *.* TO aaa@192.168.0.232 IDENTIFIED BY ‘redhat‘;
Query OK, 0 rows affected (0.00 sec)
mysql> flush privileges;
Query OK, 0 rows affected (0.00 sec)
mysql> FLUSH TABLES WITH READ LOCK;
Query OK, 0 rows affected (0.00 sec)
[root@localhost ~]# mysqldump -u root -predhat yfshare >/root/yfshare.sql
[root@localhost ~]# ls yfshare.sql
yfshare.sql
[root@localhost ~]# scp yfshare.sql root@192.168.0.232:/root/
mysql> unlock tables;
Query OK, 0 rows affected (0.00 sec)
[root@localhost ~]# scp yfshare.sql
在mysql2上测试登录下这个用户(如果登不上看下是否被防火墙挡了在看my.cnf文件):
看看my.cnf这两个地方:#skip-networking和#bind-address
[root@localhost ~]# mysql -h192.168.0.231 -u aaa -predhat --port 3306
mysql>
在mysql2上新建数据库yfshare
[root@localhost ~]# mysql -u root -predhat
mysql> create database yfshare;
Query OK, 1 row affected (0.00 sec)
mysql> use yfshare;
Database changed
mysql> source yfshare.sql
配置mysql1的my.cnf文件
[root@localhost ~]# head -n 42 /usr/local/mysql/etc/my.cnf |tail -n 4
server-id=1
log_bin=mysql-bin
binlog-do-db=yfshare
binlog-ignore-db=test,mysql
[root@localhost ~]#
[root@localhost ~]# /etc/init.d/mysqld restart
Shutting down MySQL. SUCCESS!
Starting MySQL.. SUCCESS!
[root@localhost ~]
查看mysql1状态:
mysql> show master status;
+------------------+----------+--------------+------------------+
| File             | Position | Binlog_Do_DB | Binlog_Ignore_DB |
+------------------+----------+--------------+------------------+
| mysql-bin.000010 |     2625 | yfshare      | test,mysql       |
+------------------+----------+--------------+------------------+
1 row in set (0.00 sec)
mysql>
配置mysql2的my.cnf文件:
[root@localhost ~]# head -n 44 /usr/local/mysql/etc/my.cnf |tail -n 6
server-id=2
log_bin=mysql-bin
binlog-do-db=yfshare
binlog-ignore-db=test,mysql
log_slave_updates=1                           //开启级联功能
[root@localhost ~]#
[root@localhost ~]# /etc/init.d/mysqld restart
Shutting down MySQL. SUCCESS!
Starting MySQL.. SUCCESS!
[root@localhost ~]#
进入mysql2控制台
mysql> show variables like ‘%server_id%‘;
+---------------+-------+
| Variable_name | Value |
+---------------+-------+
| server_id     | 2     |
+---------------+-------+
1 row in set (0.01 sec)
mysql>
mysql> slave stop;
Query OK, 0 rows affected, 1 warning (0.00 sec)
mysql> change master to master_host=‘192.168.0.231‘,master_user=‘aaa‘,master_password=‘redhat‘,master_log_file=‘mysql-bin.000010‘ ,master_log_pos=2625;
Query OK, 0 rows affected (0.04 sec)
mysql> slave start;
Query OK, 0 rows affected (0.00 sec)
mysql> show slave status\G
*************************** 1. row ***************************
               Slave_IO_State: Waiting for master to send event
                  Master_Host: 192.168.0.231
                  Master_User: aaa
                  Master_Port: 3306
                Connect_Retry: 60
              Master_Log_File: mysql-bin.000010
          Read_Master_Log_Pos: 2625
               Relay_Log_File: localhost-relay-bin.000004
                Relay_Log_Pos: 649
        Relay_Master_Log_File: mysql-bin.000010
             Slave_IO_Running: Yes
            Slave_SQL_Running: Yes
              Replicate_Do_DB:
          Replicate_Ignore_DB:
           Replicate_Do_Table:
       Replicate_Ignore_Table:
      Replicate_Wild_Do_Table:
  Replicate_Wild_Ignore_Table:
                   Last_Errno: 0
                   Last_Error:
                 Skip_Counter: 0
          Exec_Master_Log_Pos: 2625
              Relay_Log_Space: 809
              Until_Condition: None
               Until_Log_File:
                Until_Log_Pos: 0
           Master_SSL_Allowed: No
           Master_SSL_CA_File:
           Master_SSL_CA_Path:
              Master_SSL_Cert:
            Master_SSL_Cipher:
               Master_SSL_Key:
        Seconds_Behind_Master: 0
Master_SSL_Verify_Server_Cert: No
                Last_IO_Errno: 0
                Last_IO_Error:
               Last_SQL_Errno: 0
               Last_SQL_Error:
  Replicate_Ignore_Server_Ids:
             Master_Server_Id: 1
1 row in set (0.00 sec)
mysql>
在mysql2上配置:
mysql> flush privileges;
Query OK, 0 rows affected (0.00 sec)
mysql> CREATE USER ‘bbb‘@‘192.168.0.232‘ IDENTIFIED BY ‘redhat‘;
Query OK, 0 rows affected (0.00 sec)
mysql> GRANT REPLICATION SLAVE ON *.* TO ‘bbb‘@‘192.168.0.232‘ IDENTIFIED BY ‘redhat‘;
Query OK, 0 rows affected (0.00 sec)
mysql> flush privileges;
Query OK, 0 rows affected (0.00 sec)
mysql> FLUSH TABLES WITH READ LOCK;
Query OK, 0 rows affected (0.00 sec)
[root@localhost ~]# mysqldump -u root -predhat yfshare >/root/yfshare.sql
[root@localhost ~]# scp yfshare.sql root@192.168.0.232:/root/
mysql> unlock tables;
Query OK, 0 rows affected (0.00 sec)
mysql> show master status;
+------------------+----------+--------------+------------------+
| File             | Position | Binlog_Do_DB | Binlog_Ignore_DB |
+------------------+----------+--------------+------------------+
| mysql-bin.000029 |      503 | yfshare      | test,mysql       |
+------------------+----------+--------------+------------------+
1 row in set (0.00 sec)
mysql>
在mysql3上配置:
[root@localhost ~]# head -n 42 /usr/local/mysql/etc/my.cnf |tail -n 4

server-id=3

log_bin=mysql-bin

binlog-do-db=yfshare

binlog-ignore-db=test,mysql

[root@localhost ~]#

[root@localhost ~]# /etc/init.d/mysqld restart

Shutting down MySQL. SUCCESS!

Starting MySQL.. SUCCESS!

[root@localhost ~]#
在mysql3上测试登录下这个用户(如果登不上看下是否被防火墙挡了在看my.cnf文件):
看看my.cnf这两个地方:#skip-networking和#bind-address
[root@localhost ~]# mysql -h192.168.0.232 -u bbb -predhat --port 3306
mysql>
mysql> slave stop;
Query OK, 0 rows affected, 1 warning (0.00 sec)
mysql> change master to master_host=‘192.168.0.232‘,master_user=‘bbb‘,master_password=‘redhat‘,master_log_file=‘mysql-bin.000029‘ ,master_log_pos=503;
Query OK, 0 rows affected (0.04 sec)
mysql> slave start;
Query OK, 0 rows affected (0.00 sec)
mysql> show slave status\G
*************************** 1. row ***************************
               Slave_IO_State: Waiting for master to send event
                  Master_Host: 192.168.0.232
                  Master_User: bbb
                  Master_Port: 3306
                Connect_Retry: 60
              Master_Log_File: mysql-bin.000029
          Read_Master_Log_Pos: 503
               Relay_Log_File: localhost-relay-bin.000006
                Relay_Log_Pos: 649
        Relay_Master_Log_File: mysql-bin.000029
             Slave_IO_Running: Yes
            Slave_SQL_Running: Yes
              Replicate_Do_DB:
          Replicate_Ignore_DB:
           Replicate_Do_Table:
       Replicate_Ignore_Table:
      Replicate_Wild_Do_Table:
  Replicate_Wild_Ignore_Table:
                   Last_Errno: 0
                   Last_Error:
                 Skip_Counter: 0
          Exec_Master_Log_Pos: 503
              Relay_Log_Space: 809
              Until_Condition: None
               Until_Log_File:
                Until_Log_Pos: 0
           Master_SSL_Allowed: No
           Master_SSL_CA_File:
           Master_SSL_CA_Path:
              Master_SSL_Cert:
            Master_SSL_Cipher:
               Master_SSL_Key:
        Seconds_Behind_Master: 0
Master_SSL_Verify_Server_Cert: No
                Last_IO_Errno: 0
                Last_IO_Error:
               Last_SQL_Errno: 0
               Last_SQL_Error:
  Replicate_Ignore_Server_Ids:
             Master_Server_Id: 2
1 row in set (0.00 sec)
mysql>
这样配置了后以后主服务器只要有新数据写入,从服务器就会自动同步
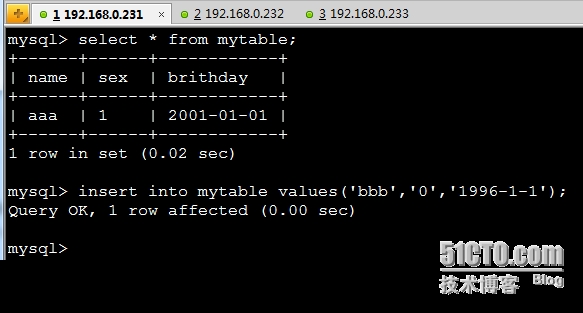
测试下:
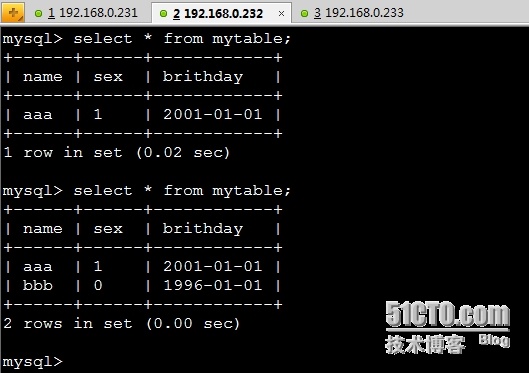
在mysql2上不做任何数据操作:(mysql会自动同步)
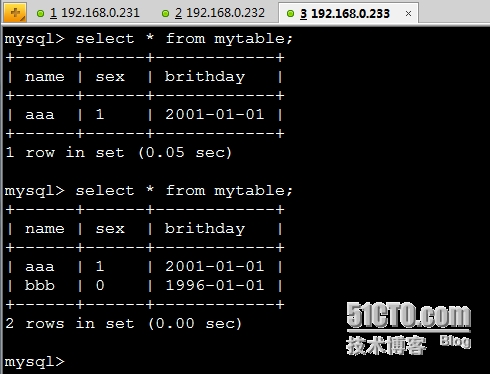
mysq3也是:
Question:
Last_IO_Errno: 1593
Last_IO_Error: Fatal error: The slave I/O thread stops because master and slave have equal MySQL server ids; these ids must be different for replication to work (or the --replicate-same-server-id option must be used on slave but this does not always make sense; please check the manual before using it).
Last_SQL_Errno: 0
如果报这个错,是server-id与slave-id冲突了(通过这个命令查看show variables like ‘server_id‘;)
mysql> show variables like ‘server_id‘;
+---------------+-------+
| Variable_name | Value |
+---------------+-------+
| server_id | 2 |
+---------------+-------+
1 row in set (0.00 sec)
mysql>
在/usr/local/mysql/etc/my.cnf里面默认就定义了一个server-id=1把这个值改下就行了
搭建Mysql读写分离:(未测试)
关闭防火墙或添加对应规则,否则slave不能连接master,会导致同步失败
数据库Master主服务器:192.168.0.231
数据库从服务器:192.168.0.232
MySQL-Proxy调度服务器:192.168.0.233
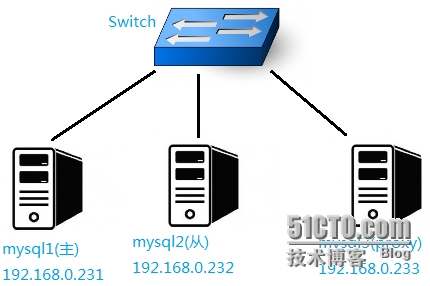
先让mysql1与mysql2实现主从复制
[root@localhost ~]# yum -y install gcc gcc-c++ autoconf automake zlib ncurses-devel libtool flex pkgconfig libevent glib libxml
[root@localhost software]# tar -zxvf libmcrypt-2.5.7.tar.gz &>/dev/null
[root@localhost software]# cd libmcrypt-2.5.7
[root@localhost libmcrypt-2.5.7]# ./configure --prefix=/usr/local/libmcrypt &&make &&make install
[root@localhost software]# yum -y install readline readline-devel
[root@localhost software]# tar -zxvf lua-5.2.0.tar.gz &>/dev/null
[root@localhost software]# cd lua-5.2.0
[root@localhost lua-5.2.0]# make linux
[root@localhost lua-5.2.0]# make install
[root@localhost software]# tar -zxvf mysql-proxy-0.8.5-linux-el6-x86-64bit.tar.gz &>/dev/null
[root@localhost software]# mv mysql-proxy-0.8.5-linux-el6-x86-64bit /usr/local/mysql-proxy
[root@localhost software]# mkdir /usr/local/mysql-proxy/log -p
[root@localhost software]# touch /usr/local/mysql-proxy/log/mysql-proxy.log
[root@localhost software]# mkdir /usr/local/mysql-proxy/run -p
[root@localhost software]# touch /usr/local/mysql-proxy/run/mysql-proxy.pid
[root@localhost software]# /etc/init.d/mysql-proxy start
Starting mysql-proxy:
ok
[root@localhost software]# netstat -tunlp|grep proxy
tcp        0      0 0.0.0.0:4040                0.0.0.0:*                   LISTEN      22325/mysql-proxy
[root@localhost software]# ps -ef|grep mysql-proxy|grep -v grep
root     22325     1  0 09:13 ?        00:00:00 /usr/local/mysql-proxy/libexec/mysql-proxy --proxy-read-only-backend-addresses=192.168.0.232:3306 --proxy-backend-addresses=192.168.0.231:3306 --proxy-lua-script=/usr/local/mysql-proxy/share/doc/mysql-proxy/rw-splitting.lua --daemon --pid-file=/usr/local/mysql-proxy/run/mysql-proxy.pid --user=root --log-level=debug --log-file=/usr/local/mysql-proxy/log/mysql-proxy.log
[root@localhost software]#
=====脚本参数详解=====
PROXY_PATH=/usr/local/mysql-proxy/bin              //定义服务二进制文件路径
proxy-read-only-backend-addresses=192.168.0.232:3306        //指定只读mysql主机地址及端口
proxy-backend-addresses=192.168.0.231:3306               //指定mysql主机地址及端口
proxy-lua-script=/usr/local/mysql-proxy/share/doc/mysql-proxy/rw-splitting.lua"   //指定lua脚本,在这里,使用的是rw-splitting脚本,用于读写分离
$NICELEVEL $PROXY_PATH/mysql-proxy $PROXY_OPTIONS
--daemon                    //以守护进程方式启动
--pid-file=$PROXY_PID       //指定pid文件
--user=root                 //以root方式运行
--log-level=debug           //定义log日志级别,由高到低分别有(error|warning|info|message|debug)
--log-file=/usr/local/mysql-proxy/log/mysql-proxy.log          //定义log日志文件路径
在mysql-proxy上登录测试下:
mysql> show processlist;
+----+------+-----------+------+---------+------+-------+------------------+
| Id | User | Host      | db   | Command | Time | State | Info             |
+----+------+-----------+------+---------+------+-------+------------------+
|  3 | root | localhost | NULL | Query   |    0 | NULL  | show processlist |
+----+------+-----------+------+---------+------+-------+------------------+
1 row in set (0.00 sec)
mysql>
安装测试工具sysbench测试mysql性能:
[root@localhost software]# tar -zxvf sysbench-0.4.10.tar.gz &>/dev/null
[root@localhost software]# cd sysbench-0.4.10
[root@localhost sysbench-0.4.10]# head -n 78 configure.ac |tail -n 6|grep -v ^$
# Checks for programs.
AC_PROG_CC
#AC_PROG_LIBTOOL
AC_PROG_RANLIB
AX_CHECK_DOCBOOK
[root@localhost sysbench-0.4.10]# ./autogen.sh
[root@localhost sysbench-0.4.10]# ./configure --with-mysql-includes=/usr/local/mysql/include --with-mysql-libs=/usr/local/mysql/lib
[root@localhost sysbench-0.4.10]# make &&make install
[root@localhost ~]# ln -s /usr/local/bin/sysbench /bin/
[root@localhost ~]# ln -s /usr/local/mysql/lib/libmysqlclient.so.18 /usr/lib64/
[root@localhost ~]# sysbench --test=oltp --mysql-table-engine=innodb --oltp-table-size=10000 --mysql-socket=/usr/local/mysql/mysql.sock --mysql-user=root --mysql-password=redhat --mysql-db=testsysbench prepare
sysbench 0.4.10:  multi-threaded system evaluation benchmark
No DB drivers specified, using mysql
Creating table ‘sbtest‘...
Creating 10000 records in table ‘sbtest‘...
[root@localhost ~]# sysbench --test=oltp --mysql-table-engine=innodb --oltp-table-size=10000 --mysql-socket=/usr/local/mysql/mysql.sock --mysql-user=root --mysql-password=redhat --mysql-db=testsysbench run
sysbench 0.4.10:  multi-threaded system evaluation benchmark
No DB drivers specified, using mysql
WARNING: Preparing of "BEGIN" is unsupported, using emulation
Running the test with following options:
Number of threads: 1
Doing OLTP test.
Running mixed OLTP test
Using Special distribution (12 iterations,  1 pct of values are returned in 75 pct cases)
Using "BEGIN" for starting transactions
Using auto_inc on the id column
Maximum number of requests for OLTP test is limited to 10000
Threads started!
Done.
OLTP test statistics:
    queries performed:
        read:                            140000
        write:                           50000
        other:                           20000
        total:                           210000
    transactions:                        10000  (110.69 per sec.)
    deadlocks:                           0      (0.00 per sec.)
    read/write requests:                 190000 (2103.17 per sec.)
    other operations:                    20000  (221.39 per sec.)
Test execution summary:
    total time:                          90.3398s
    total number of events:              10000
    total time taken by event execution: 90.2339
    per-request statistics:
         min:                                  7.30ms
         avg:                                  9.02ms
         max:                                 94.94ms
         approx.  95 percentile:               9.73ms
Threads fairness:
    events (avg/stddev):           10000.0000/0.00
    execution time (avg/stddev):   90.2339/0.00
[root@localhost ~]#
本文出自 “鹏城-酱油瓶” 博客,谢绝转载!
MYSQL主从同步+读写分离
标签:mysql 主从同步