时间:2021-07-01 10:21:17 帮助过:7人阅读
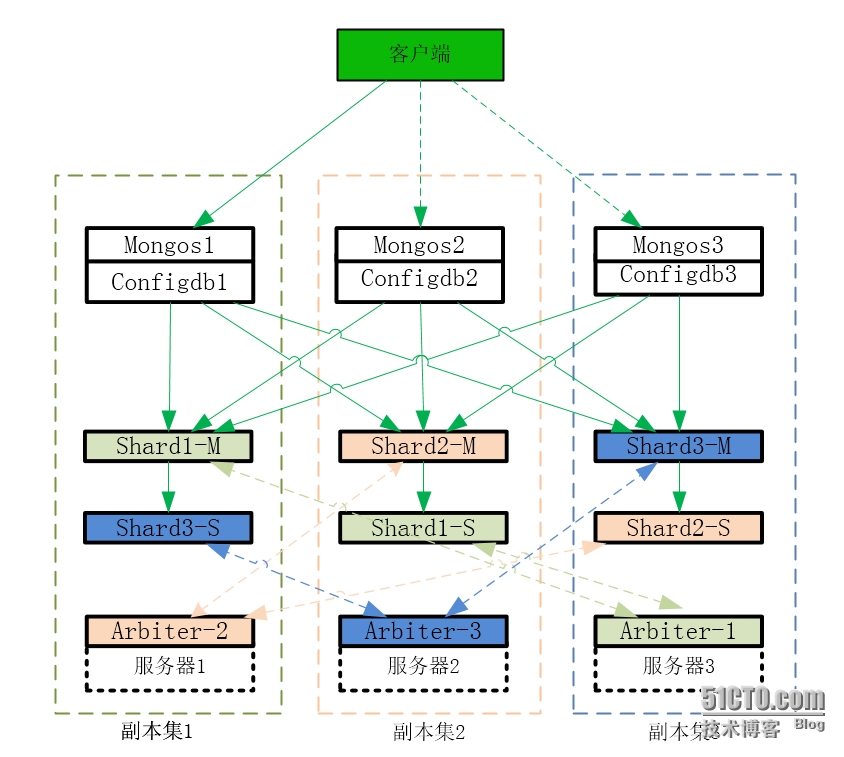
mongos :路由进程, 应用程序接入mongos再查询到具体分片。
configdb:路由表服务,每一台都具有全部chunk的路由信息。
shard:为数据存储分片,每一个分片可以使副本集,这里我使用了三个复制集。
arbiter:如果主服务器崩溃了,仲裁服务器(ARBITER)会将优先级高的成员选为主节点。
每个成员每个两秒就会向其他成员发送一次心跳请求(heartbest request).心跳的请求信息量非常小。
一、拓扑图
二、服务器信息
系统:Centos-6.5-x86-64位,内核版本:2.6.32
mogodb版本:mongodb-linux-x86_64-2.6.7.tgz
三台服务器多个实例:
复制集1 IP:192.168.2.134
端口分配:
mongos1:27111
configdb1:27100
mongo主分片1:27001
mongo备1:27011
arbiter1:27010
复制集2 IP:192.168.2.133
端口分配:
mongos2:27222
configdb2:27200
mongo主分片2:27002
mongo备2:27022
arbiter2:27020
复制集3 IP:192.168.2.132
端口分配:
mongos3:27333
configdb3:27300
mongo主分片3:27003
mongo备3:27033
arbiter3:27030
三、配置
三台服务器都执行:
tar -zxvf mongodb-linux-x86_64-2.6.7.tgz
mv mongodb-linux-x86_64-2.6.7 /usr/local/
cd /usr/local/mongodb-linux-x86_64-2.6.7/
mkdir conf
mkdir /data/mongodb/{logs,pid}
3.1、 192.168.2.134服务器配置:
mkdir /data/mongodb/{shard1,shard3,configdb1,arbiter2}/data
mongos1:27111
[root@localhost mongodb]# cat /usr/local/mongodb-linux-x86_64-2.6.7/conf/mongos1.conf
logpath = /data/mongodb/logs/mongos1.log
logappend = true
fork = true
port = 27111
configdb = 192.168.2.134:27100,192.168.2.133:27200,192.168.2.132:27300
configdb1:27100
[root@localhost mongodb]# cat /usr/local/mongodb-linux-x86_64-2.6.7/conf/configdb1.conf
logpath = /data/mongodb/logs/configdb1.log
logappend = true
pidfilepath = /data/mongodb/pid/config.pid
dbpath = /data/mongodb/configdb1/data
fork = true
port = 27100
oplogSize = 2048
configsvr = true
mongo主分片1:27001
[root@localhost mongodb]# cat /usr/local/mongodb-linux-x86_64-2.6.7/conf/shard1.conf
logpath = /data/mongodb/logs/shard1.log
logappend = true
pidfilepath = /data/mongodb/pid/shard1.pid
dbpath = /data/mongodb/shard1/data
directoryperdb = true
replSet = replset1
rest = true
oplogSize = 1024
fork = true
shardsvr = true
port = 27001
journal = true
mongo3备:27033
[root@localhost mongodb]# cat /usr/local/mongodb-linux-x86_64-2.6.7/conf/shard3.conf
logpath = /data/mongodb/logs/shard3.log
logappend = true
pidfilepath = /data/mongodb/pid/shard3.pid
dbpath = /data/mongodb/shard3/data
directoryperdb = true
replSet = replset3
rest = true
oplogSize = 1024
fork = true
shardsvr = true
port = 27033
journal = true
arbiter2:27020
[root@localhost mongodb]# cat /usr/local/mongodb-linux-x86_64-2.6.7/conf/arbiter2.conf
logpath = /data/mongodb/logs/arbiter2.log
logappend = true
pidfilepath = /data/mongodb/pid/arbiter2.pid
dbpath = /data/mongodb/arbiter2/data
directoryperdb = true
replSet = replset2
rest = true
oplogSize = 1024
fork = true
shardsvr = true
port = 27020
journal = true
服务器启动实例:
/usr/local/mongodb-linux-x86_64-2.6.7/bin/mongod -f /usr/local/mongodb-linux-x86_64-2.6.7/conf/shard1.conf
/usr/local/mongodb-linux-x86_64-2.6.7/bin/mongod -f /usr/local/mongodb-linux-x86_64-2.6.7/conf/arbiter2.conf
/usr/local/mongodb-linux-x86_64-2.6.7/bin/mongod -f /usr/local/mongodb-linux-x86_64-2.6.7/conf/shard3.conf
/usr/local/mongodb-linux-x86_64-2.6.7/bin/mongod -f /usr/local/mongodb-linux-x86_64-2.6.7/conf/configdb1.conf
/usr/local/mongodb-linux-x86_64-2.6.7/bin/mongos -f /usr/local/mongodb-linux-x86_64-2.6.7/conf/mongos1.conf
3.2、 192.168.2.133 服务器配置:
mkdir /data/mongodb/{shard1,shard2,configdb2,arbiter3}/data
mongos2:27222
[root@localhost ~]# cat /usr/local/mongodb-linux-x86_64-2.6.7/conf/mongos2.conf
logpath = /data/mongodb/logs/mongos.log
logappend = true
fork = true
port = 27222
configdb = 192.168.2.134:27100,192.168.2.133:27200,192.168.2.132:27300
configdb2:27200
configdb2:27200
[root@localhost ~]# cat /usr/local/mongodb-linux-x86_64-2.6.7/conf/configdb2.conf
logpath = /data/mongodb/logs/configdb2.log
logappend = true
pidfilepath = /data/mongodb/pid/config2.pid
dbpath = /data/mongodb/configdb2/data
fork = true
port = 27200
oplogSize = 2048
configsvr = true
mongo主分片2:27002
[root@localhost ~]# cat /usr/local/mongodb-linux-x86_64-2.6.7/conf/shard2.conf
logpath = /data/mongodb/logs/shard2.log
logappend = true
pidfilepath = /data/mongodb/pid/shard2.pid
dbpath = /data/mongodb/shard2/data
directoryperdb = true
replSet = replset2
rest = true
oplogSize = 1024
fork = true
shardsvr = true
port = 27002
journal = true
mongo备1:27011
[root@localhost ~]# cat /usr/local/mongodb-linux-x86_64-2.6.7/conf/shard1.conf
logpath = /data/mongodb/logs/shard1.log
logappend = true
pidfilepath = /data/mongodb/pid/shard1.pid
dbpath = /data/mongodb/shard1/data
directoryperdb = true
replSet = replset1
rest = true
oplogSize = 1024
fork = true
shardsvr = true
port = 27011
journal = true
arbiter3:27030
[root@localhost ~]# cat /usr/local/mongodb-linux-x86_64-2.6.7/conf/arbiter3.conf
logpath = /data/mongodb/logs/arbiter3.log
logappend = true
pidfilepath = /data/mongodb/pid/arbiter3.pid
dbpath = /data/mongodb/arbiter3/data
directoryperdb = true
replSet = replset3
rest = true
oplogSize = 1024
fork = true
shardsvr = true
port = 27030
journal = true
服务器启动实例:
/usr/local/mongodb-linux-x86_64-2.6.7/bin/mongod -f /usr/local/mongodb-linux-x86_64-2.6.7/conf/shard1.conf
/usr/local/mongodb-linux-x86_64-2.6.7/bin/mongod -f /usr/local/mongodb-linux-x86_64-2.6.7/conf/arbiter3.conf
/usr/local/mongodb-linux-x86_64-2.6.7/bin/mongod -f /usr/local/mongodb-linux-x86_64-2.6.7/conf/shard2.conf
/usr/local/mongodb-linux-x86_64-2.6.7/bin/mongod -f /usr/local/mongodb-linux-x86_64-2.6.7/conf/configdb2.conf
/usr/local/mongodb-linux-x86_64-2.6.7/bin/mongos -f /usr/local/mongodb-linux-x86_64-2.6.7/conf/mongos2.conf
3.3、 192.168.2.132 服务器配置:
mkdir /data/mongodb/{shard1,shard2,configdb2,arbiter3}/data
mongos3:27333
[root@bjmdb4 ~]# cat /usr/local/mongodb-linux-x86_64-2.6.7/conf/mongos3.conf
logpath = /data/mongodb/logs/mongos.log
logappend = true
fork = true
port = 27333
configdb = 192.168.2.134:27100,192.168.2.133:27200,192.168.2.132:27300
configdb3:27300
[root@bjmdb4 ~]# cat /usr/local/mongodb-linux-x86_64-2.6.7/conf/configdb3.conf
logpath = /data/mongodb/logs/configdb3.log
logappend = true
pidfilepath = /data/mongodb/pid/config3.pid
dbpath = /data/mongodb/configdb3/data
fork = true
port = 27300
oplogSize = 2048
configsvr = true
mongo主3:27003
[root@bjmdb4 ~]# cat /usr/local/mongodb-linux-x86_64-2.6.7/conf/shard3.conf
logpath = /data/mongodb/logs/shard3.log
logappend = true
pidfilepath = /data/mongodb/pid/shard1.pid
dbpath = /data/mongodb/shard3/data
directoryperdb = true
replSet = replset3
rest = true
oplogSize = 1024
fork = true
shardsvr = true
port = 27003
journal = true
mongo备2:27022
[root@bjmdb4 ~]# cat /usr/local/mongodb-linux-x86_64-2.6.7/conf/shard2.conf
logpath = /data/mongodb/logs/shard2.log
logappend = true
pidfilepath = /data/mongodb/pid/shard1.pid
dbpath = /data/mongodb/shard2/data
directoryperdb = true
replSet = replset2
rest = true
oplogSize = 1024
fork = true
shardsvr = true
port = 27022
journal = true
arbiter1:27010
[root@bjmdb4 ~]# cat /usr/local/mongodb-linux-x86_64-2.6.7/conf/arbiter1.conf
logpath = /data/mongodb/logs/arbiter1.log
logappend = true
pidfilepath = /data/mongodb/pid/arbiter1.pid
dbpath = /data/mongodb/arbiter1/data
directoryperdb = true
replSet = replset1
rest = true
oplogSize = 1024
fork = true
shardsvr = true
port = 27010
journal = true
启动实例:
/usr/local/mongodb-linux-x86_64-2.6.7/bin/mongod -f /usr/local/mongodb-linux-x86_64-2.6.7/conf/arbiter1.conf
/usr/local/mongodb-linux-x86_64-2.6.7/bin/mongod -f /usr/local/mongodb-linux-x86_64-2.6.7/conf/shard2.conf
/usr/local/mongodb-linux-x86_64-2.6.7/bin/mongod -f /usr/local/mongodb-linux-x86_64-2.6.7/conf/shard3.conf
/usr/local/mongodb-linux-x86_64-2.6.7/bin/mongod -f /usr/local/mongodb-linux-x86_64-2.6.7/conf/configdb3.conf
/usr/local/mongodb-linux-x86_64-2.6.7/bin/mongos -f /usr/local/mongodb-linux-x86_64-2.6.7/conf/mongos3.conf
四、配置复制集
4.1、 192.168.2.134服务器配置复制集:
/usr/local/mongodb-linux-x86_64-2.6.7/bin/mongo 192.168.2.134:2700
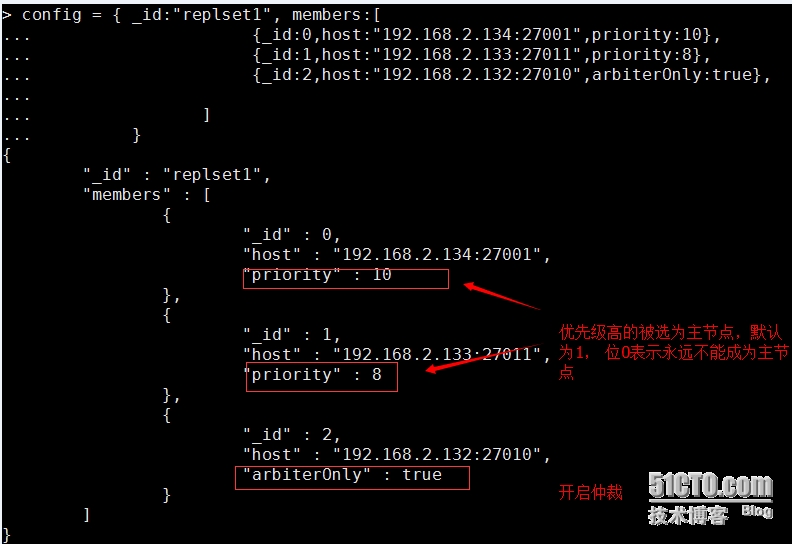
config = { _id:"replset1", members:[
{_id:0,host:"192.168.2.134:27001",priority:10},
{_id:1,host:"192.168.2.133:27011",priority:8},
{_id:2,host:"192.168.2.132:27010",arbiterOnly:true},
]
}
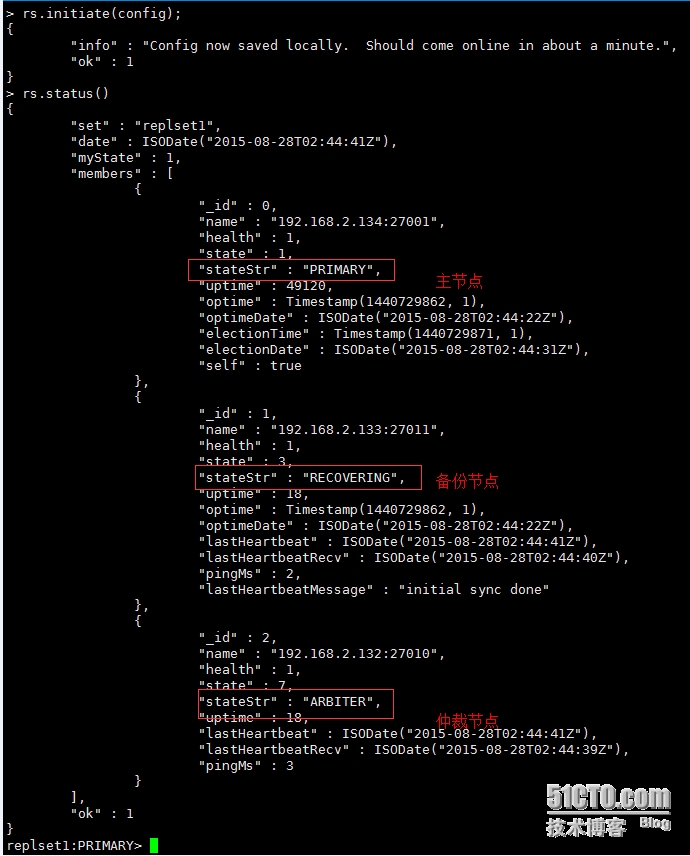
rs.initiate(config); //更新配置
rs.status() //查看配置信息
4.2、 192.168.2.133服务器配置复制集:
/usr/local/mongodb-linux-x86_64-2.6.7/bin/mongo 192.168.2.133:27002
config = { _id:"replset2", members:[
{_id:0,host:"192.168.2.133:27002",priority:10},
{_id:1,host:"192.168.2.132:27022",priority:8},
{_id:2,host:"192.168.2.134:27020",arbiterOnly:true},
]
}
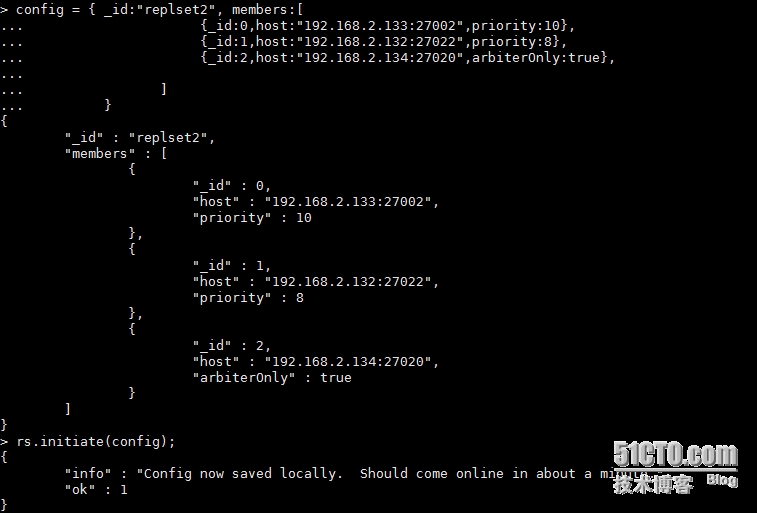
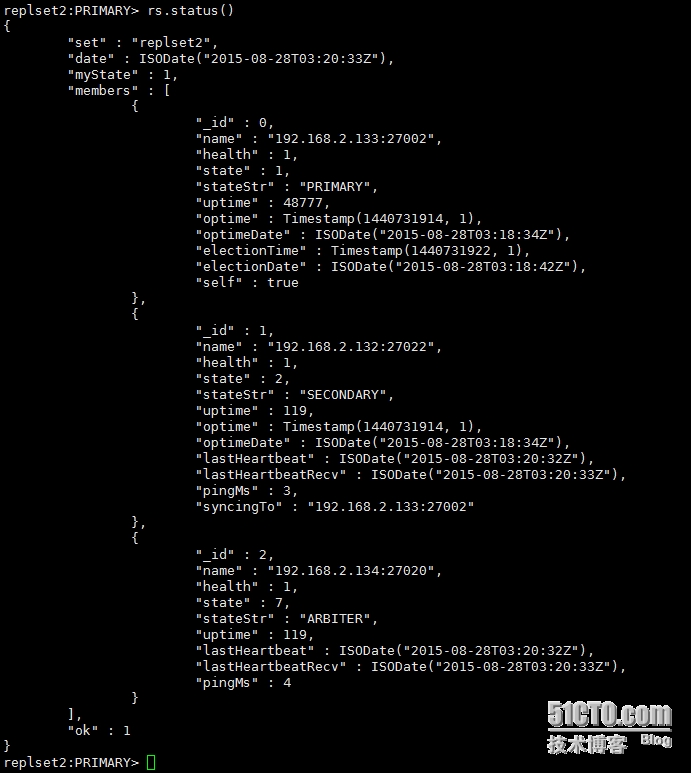
rs.initiate(config); //更新配置
rs.status() //查看配置信息
4.3、 192.168.2.132服务器配置复制集:
/usr/local/mongodb-linux-x86_64-2.6.7/bin/mongo 192.168.2.132:27003
config = { _id:"replset3", members:[
{_id:0,host:"192.168.2.132:27003",priority:10},
{_id:1,host:"192.168.2.134:27033",priority:8},
{_id:2,host:"192.168.2.133:27030",arbiterOnly:true},
]
}
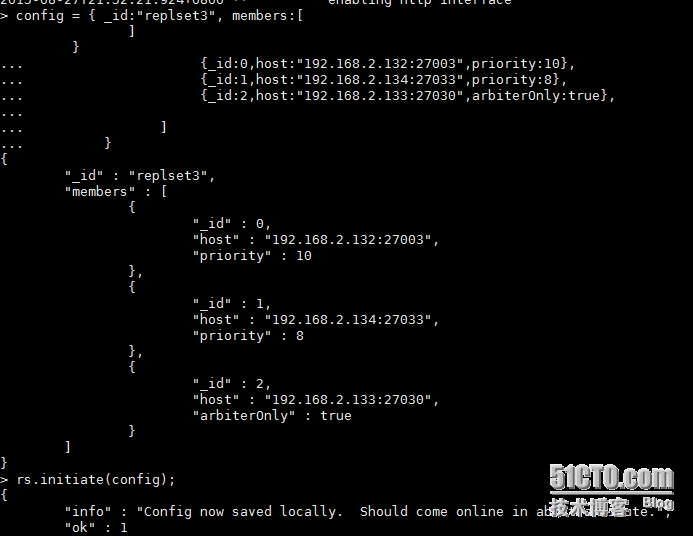
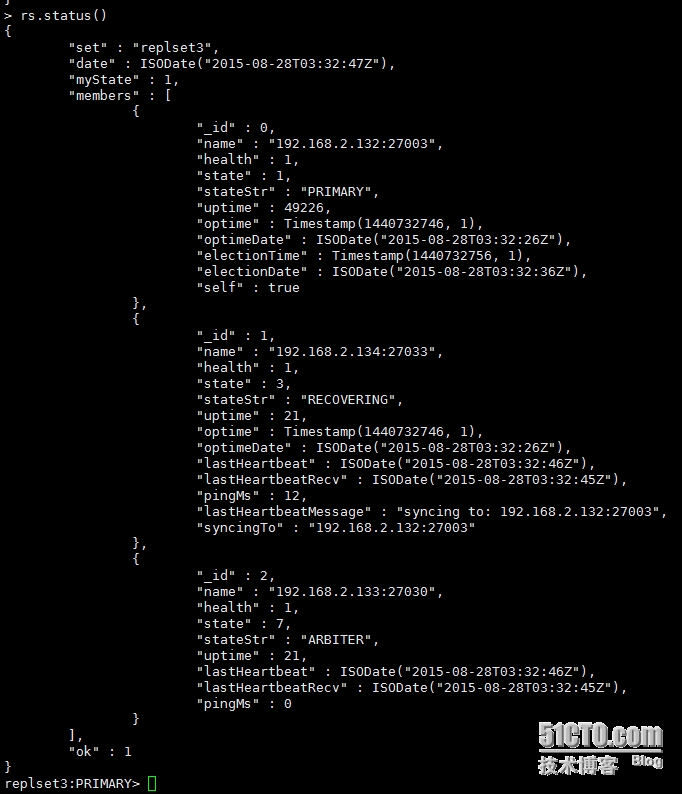
rs.initiate(config); //更新配置
rs.status() //查看配置信息
五、配置mongos串联路由信息
db.runCommand({ addshard :"replset1/192.168.2.134:27001"});
db.runCommand({ addshard :"replset2/192.168.2.133:27002"});
db.runCommand({ addshard :"replset3/192.168.2.132:27003"});
[root@localhost ~]# /usr/local/mongodb-linux-x86_64-2.6.7/bin/mongo 192.168.2.134:27111/admin
MongoDB shell version: 2.6.7
connecting to: 192.168.2.134:27111/admin
mongos>
mongos>
mongos>
mongos>
mongos> show dbs
admin   (empty)
config  0.016GB
mongos> db.runCommand({ addshard :"replset1/192.168.2.134:27001"});
{ "shardAdded" : "replset1", "ok" : 1 }
mongos> db.runCommand({ addshard :"replset2/192.168.2.133:27002"});
{ "shardAdded" : "replset2", "ok" : 1 }
mongos> db.runCommand({ addshard :"replset3/192.168.2.132:27003"});
{ "shardAdded" : "replset3", "ok" : 1 }
mongos> printShardingStatus()    //查看分片信息
--- Sharding Status ---
  sharding version: {
	"_id" : 1,
	"version" : 4,
	"minCompatibleVersion" : 4,
	"currentVersion" : 5,
	"clusterId" : ObjectId("55dfc20932ed635fd872d595")
}
  shards:
	{  "_id" : "replset1",  "host" : "replset1/192.168.2.133:27011,192.168.2.134:27001" }
	{  "_id" : "replset2",  "host" : "replset2/192.168.2.132:27022,192.168.2.133:27002" }
	{  "_id" : "replset3",  "host" : "replset3/192.168.2.132:27003,192.168.2.134:27033" }
  databases:
	{  "_id" : "admin",  "partitioned" : false,  "primary" : "config" }

mongos> sh.getBalancerState() //查看均衡器负责数据迁移
true
mongos>
六、创建数据分片
[root@localhost ~]# /usr/local/mongodb-linux-x86_64-2.6.7/bin/mongo 192.168.2.134:27111
mongos> use admin                                       //启用分片要切换到admin
switched to db admin
mongos> db.runCommand({"enablesharding": "db_jia"})    //首先对数据库开启分片,是对集合开启分片的先决条件
{ "ok" : 1 }
mongos> db.tab4.ensureIndex({"username" : "hashed"})  //创建索引
{
"raw" : {
"replset3/192.168.2.132:27003,192.168.2.134:27033" : {
"createdCollectionAutomatically" : false,
"numIndexesBefore" : 1,
"numIndexesAfter" : 2,
"ok" : 1
}
},
"ok" : 1
}
mongos> use admin
switched to db admin                               //使用GridFS散列片建(写强求会被均匀分发到分片上)
mongos> db.runCommand({"shardcollection":"db_jia.tab4", "key":{"username" : "hashed"}})
{ "collectionsharded" : "db_jia.tab4", "ok" : 1 }
mongos> for (var i= 1; i <= 90; i++)db.tab4.save({"username" : "user"+i,"crated_at" : new Date()});  //写90条数据
WriteResult({ "nInserted" : 1 })
mongos> db.tab4.find().count()
30
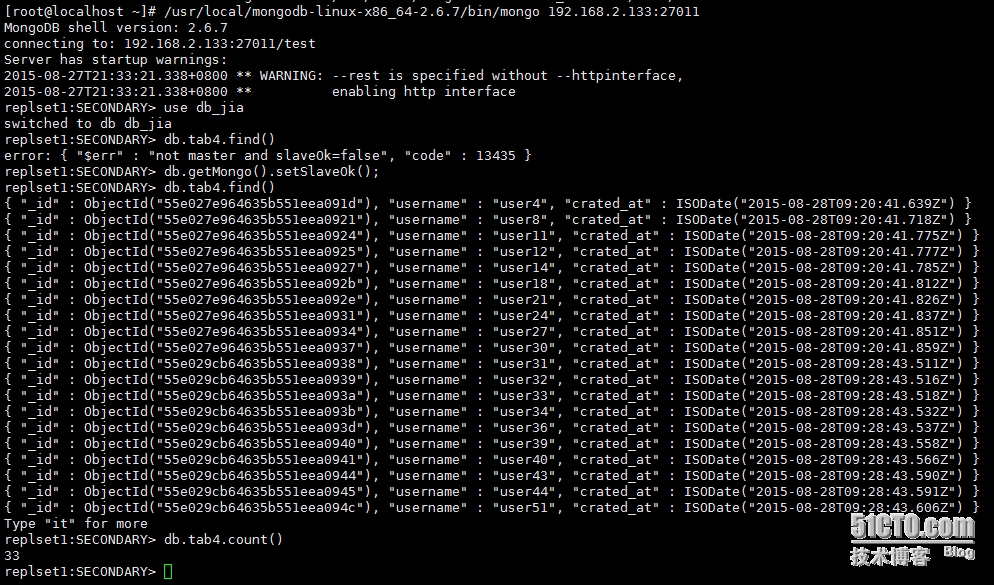
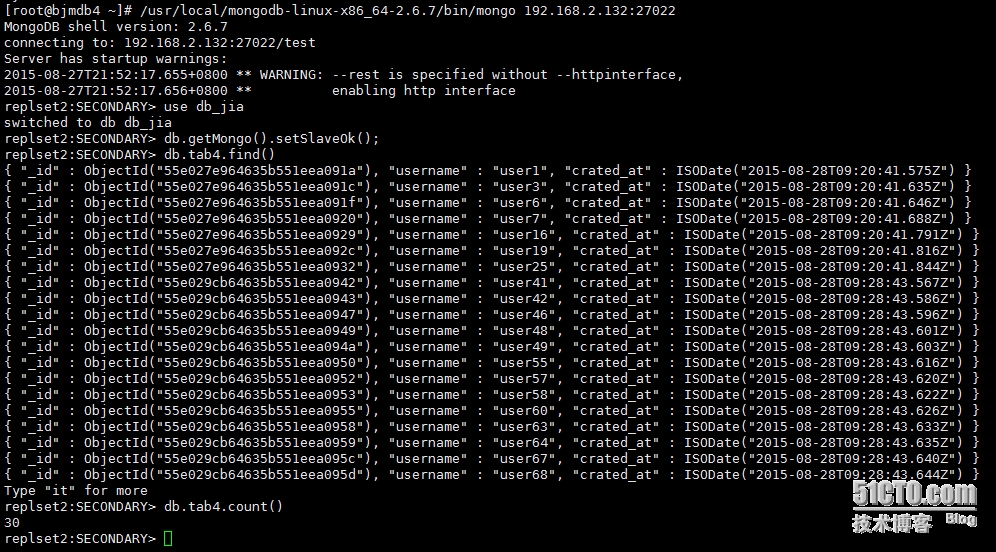
分片还是很均匀的:
6.1、 分片1查看数据:
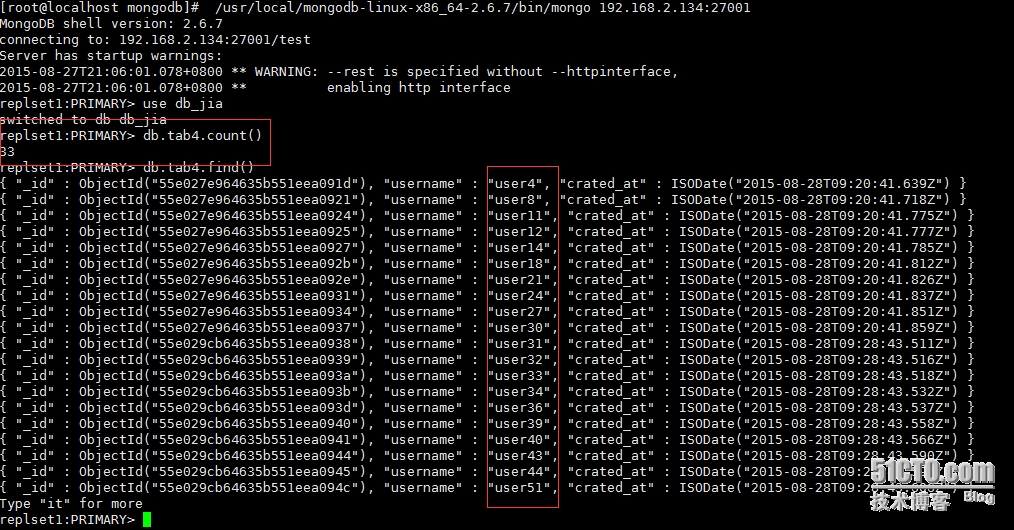
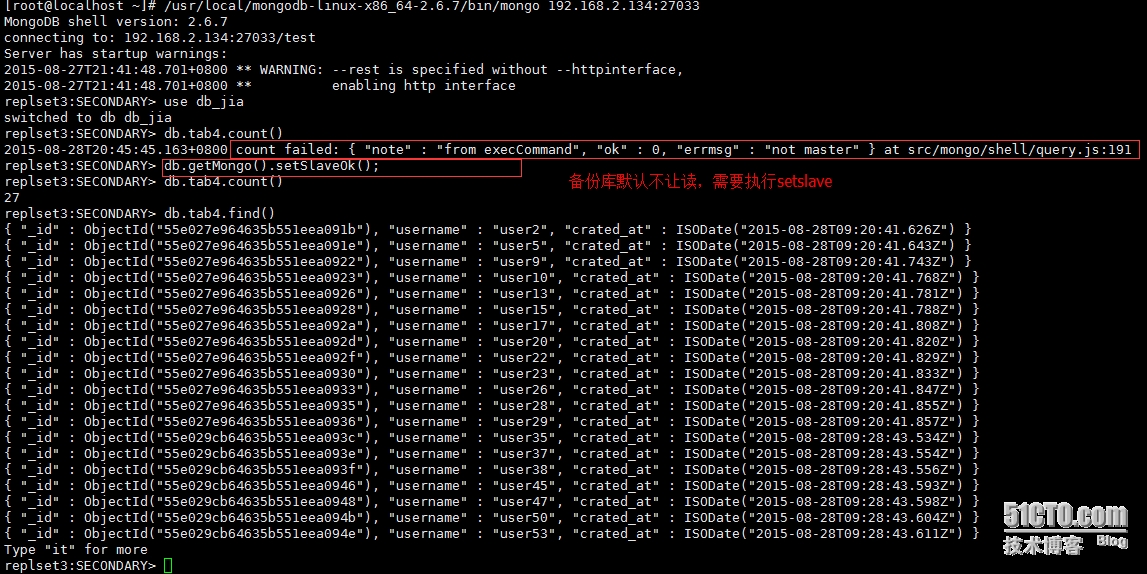
分片1备份库:
6.2、 分片2查看数据:
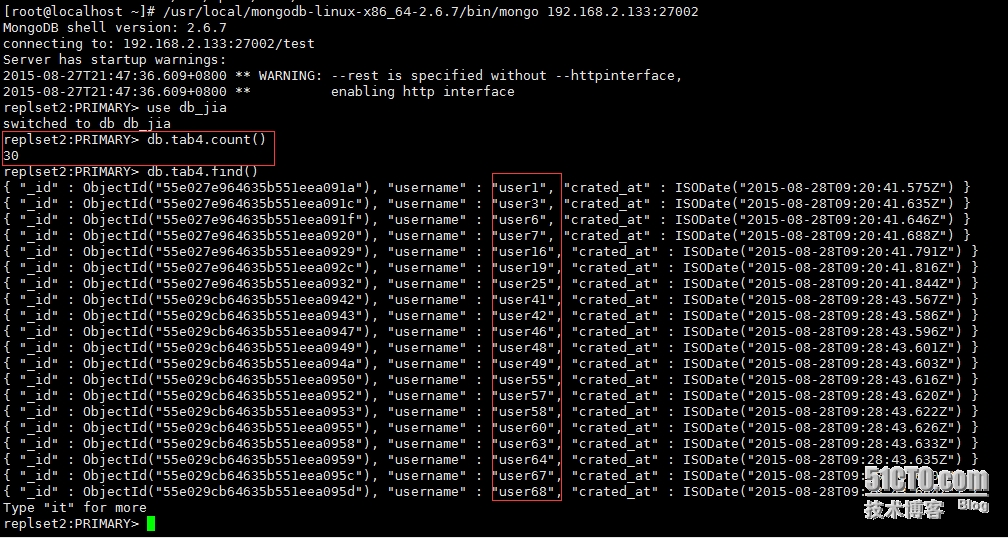
分片2备份库:
6.3、 分片3查看数据:
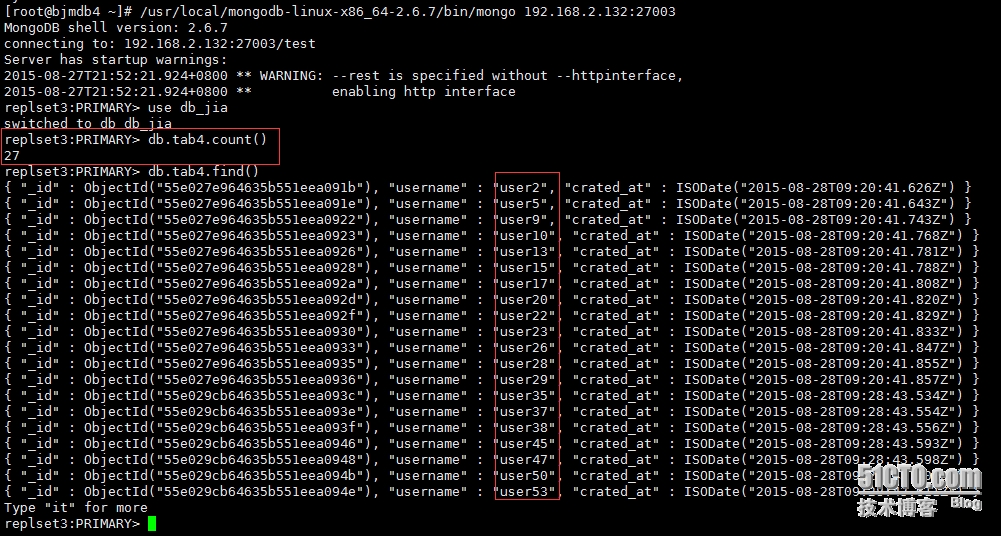
分片3备份库:
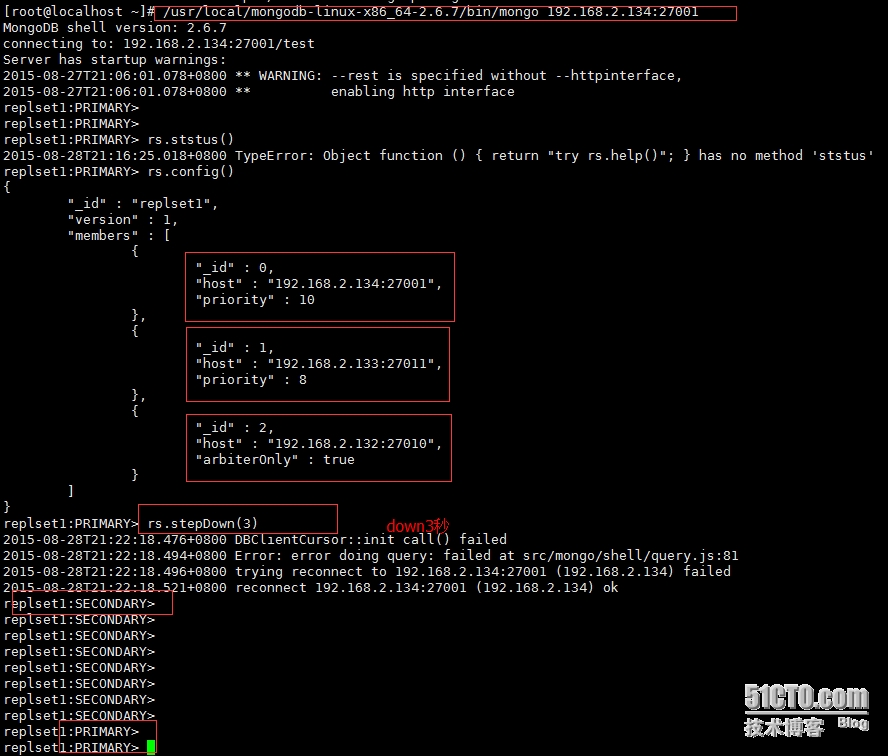
七、模拟分片1主节点故障:
主节点停掉临时3秒
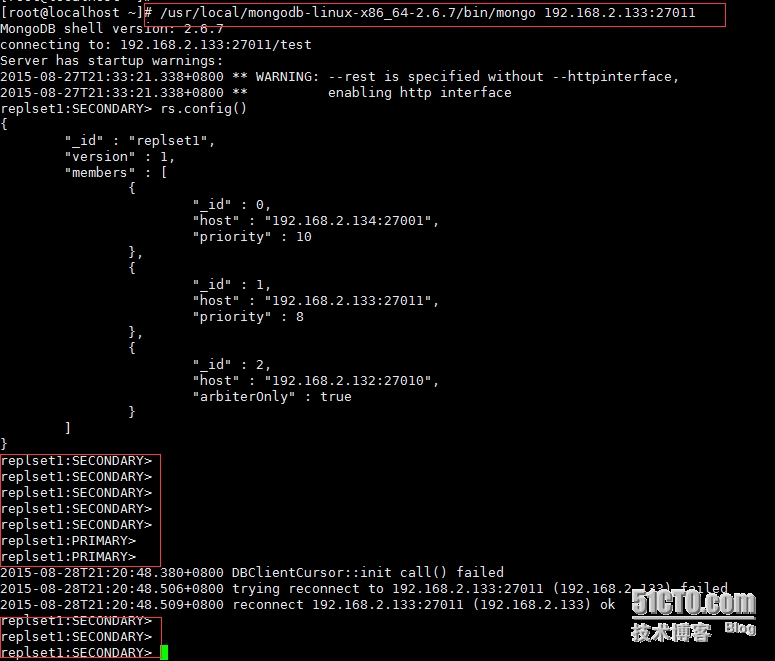
备份节点:
仲裁节点:
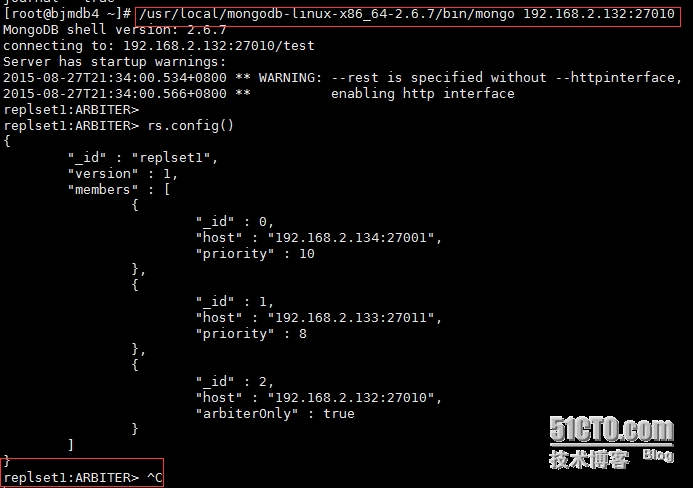
仲裁节点log:
总结:因为做了副本集,分片主节点出现故障,仲裁节点会重新选举主节点。
本文出自 “坚持自己想要的” 博客,转载请与作者联系!
mongodb分片
标签:mongodb分片