时间:2021-07-01 10:21:17 帮助过:33人阅读
Edge-facing deployments:
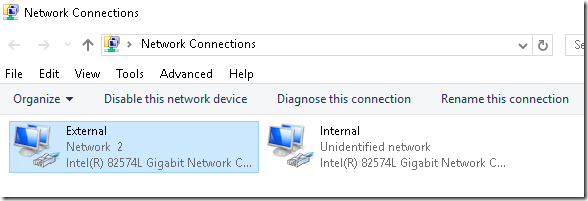
External interface connected to the public Internet using public IPv4 addressing
To configure the External interface, right-click the External adapter and choose
Properties. Highlight Internet Protocol Version 4 (TCP/IPv4) and then click
Properties. Provide an IPv4 address, subnet mask, and default gateway. DO NOT
specify any DNS servers!
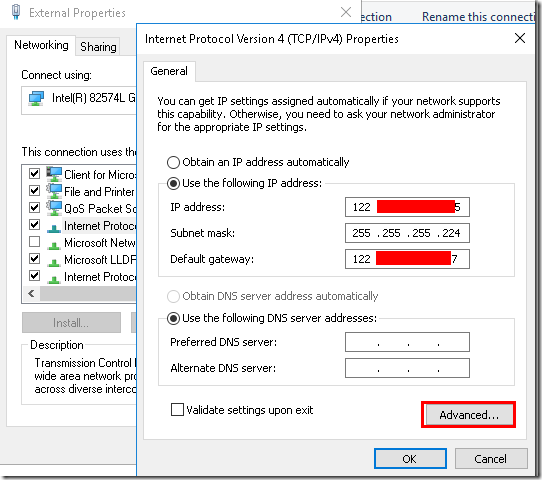
Click Advanced,Select the DNS tab and uncheck the box next to Register this connection’s addresses in DNS 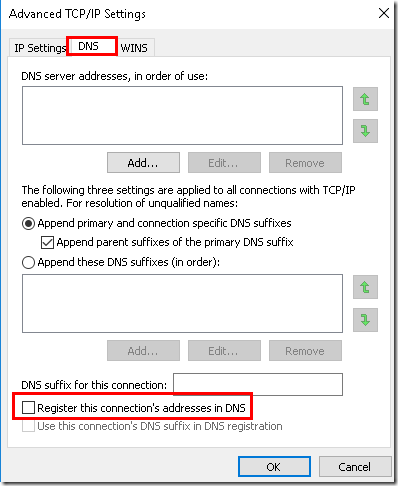
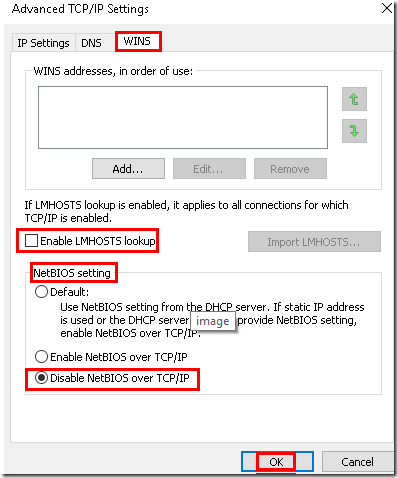
Select the WINS tab and uncheck the box next to Enable LMHOSTS lookup.
In addition, in the NetBIOS setting section select the option to Disable NetBIOS over TCP/IP
Internal interface connected to a perimeter or DMZ network or the LAN using private IPv4 addressing
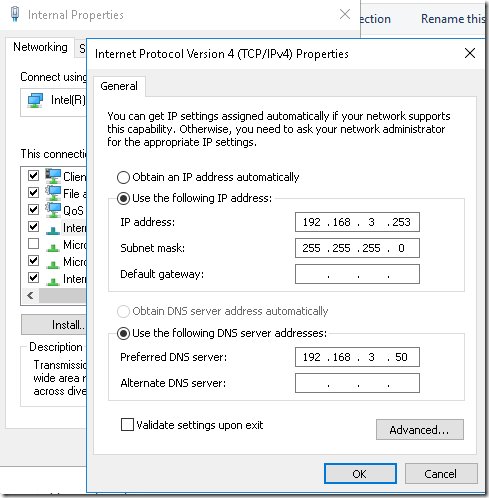
To configure the Internal network interface, right-click the Internal network
connection and choose Properties. Highlight Internet Protocol Version 4 (TCP/IPv4)
and then click Properties. Provide an IPv4 address and a subnet mask. DO NOT
specify a default gateway! Provide the IP addresses for DNS servers on the corporate
LAN as necessary
2. Static Routes
As the Internal network interface does not have a default gateway, it will be necessary to configure static routes to remote internal subnets that will need to be reachable from the DirectAccess server and by DirectAccess clients. For example, if the DirectAccess server is on the 192.168.3.0/24 subnet, but there are systems on the192.168.10.0/24 subnet that must be accessible from the DirectAccess server, a static route will be defined by entering the following commands in an elevated PowerShell command window:
New-NetRoute -InterfaceAlias <Interface_Name> –DestinationPrefix <SubnetID/Mask> -NextHop <Gateway_Address>
Using the preceding example, the command to create the static route would look like this:
New-NetRoute -InterfaceAlias Internal -DestinationPrefix 192.168.10.0/24 -NextHop 192.168.3.254
3.Join Domain and Apply Updates
Using the Add-Computer PowerShell cmdlet, it is possible to rename the computer, join it to the domain, and place the server in a specific Organizational Unit (OU) with a single command:
Add-Computer -NewName <new_computer_name> -OUPath <OU_Path> –DomainName <domain_name>
For example:
Add-Computer –NewName SEN-DAS –OUPath "OU=DAS,DC=sen,DC=hi,DC=cn" –DomainName sen.hi.cn –Restart
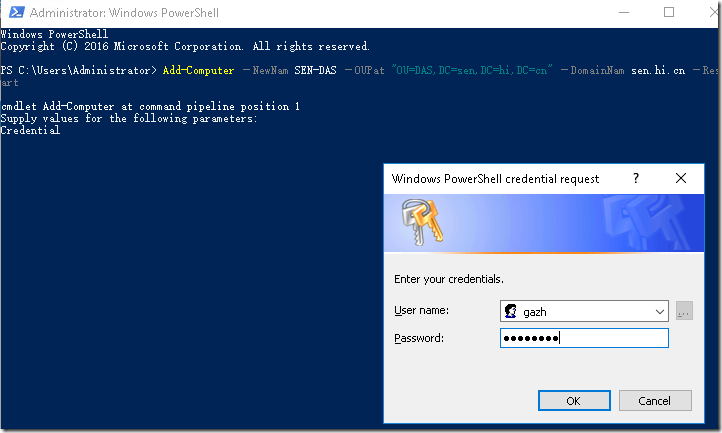
Once the DirectAccess server has been joined to the domain, proceed with installing Windows operating updates as necessary using Windows Update (Window Key + I ?Update & Security ? Check for Updates)
4.Certificates
DirectAccess requires two different types of certificates—computer (machine) certificate and an SSL certificate.
computer certificates are used for IPsec authentication and encryption. They must be issued to the DirectAccess server by an internal PKI. The certificate must include the Client Authentication Enhanced Key Usage (EKU) .
To create a certificate template, open the Certificate Services management console on the Active Directory Certificate Services (AD CS) server .
In the navigation tree, expand the server and then right-click Certificate Templates and choose Manage.
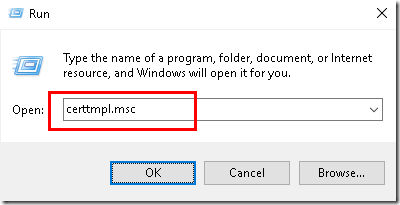
Optionally, you can press Windows Key + R and enter certtmpl.msc.
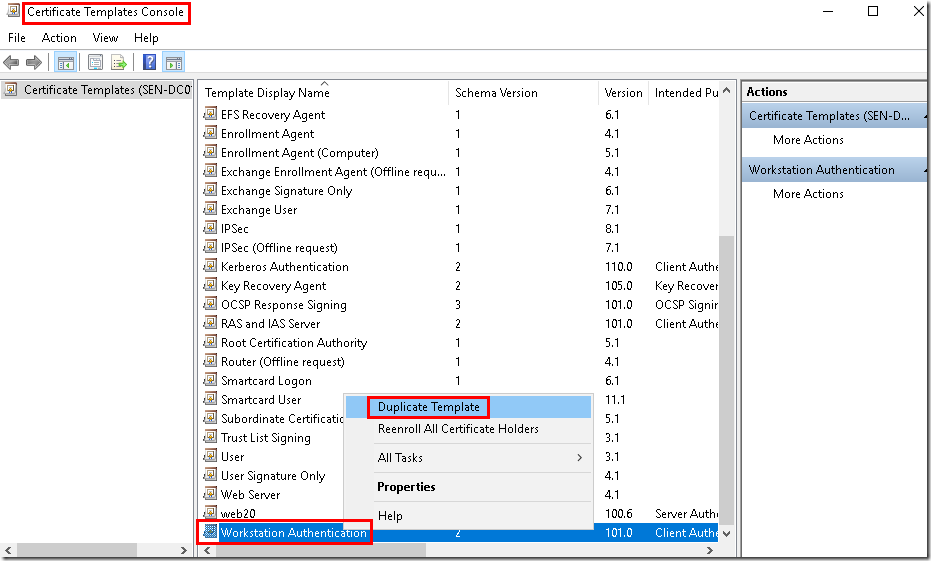
Right-click the Workstation Authentication template and choose Duplicate Template.
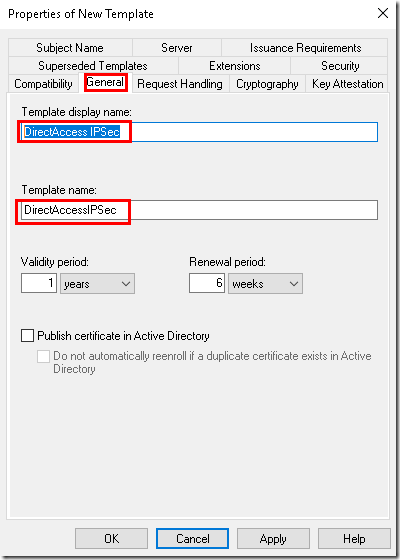
Select the Subject Name tab and choose DNS name for the Subject name format
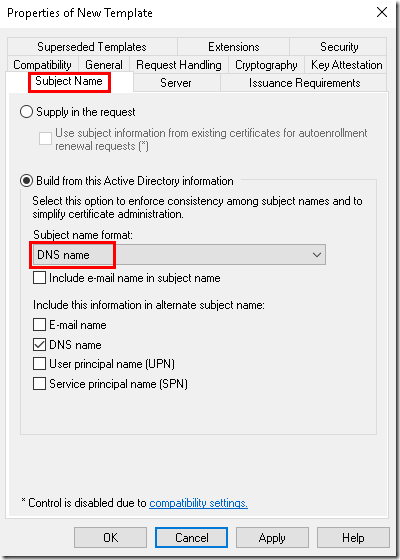
Select the Security tab and click Add. Specify the names of the DirectAccess client security group and the name of each DirectAccess server.
Optionally, a security group can be created for DirectAccess servers, and that group can be specified here.
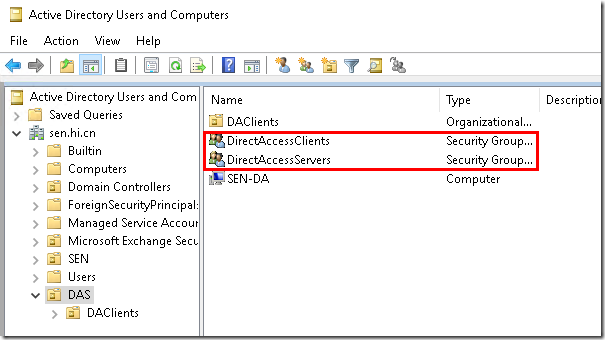
For the DirectAccess client group and the DirectAccess servers (or DirectAccess server group),check the Allow box for both Enroll and Autoenroll. Once complete, click OK
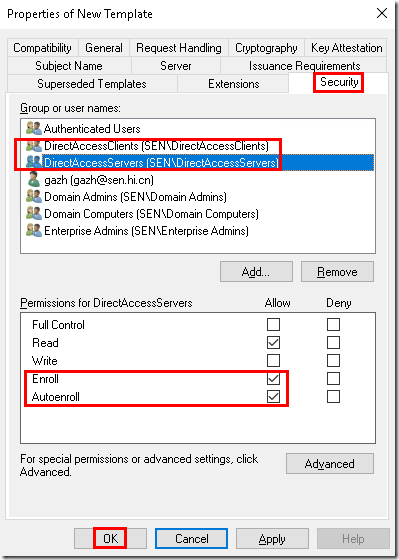
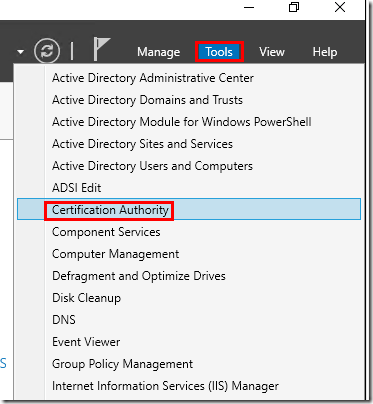
In the Certification Authority management console,
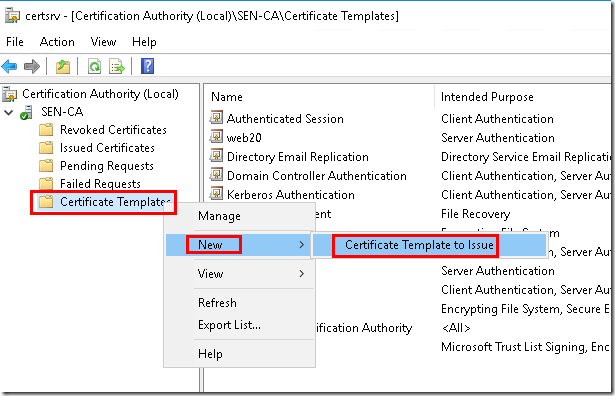
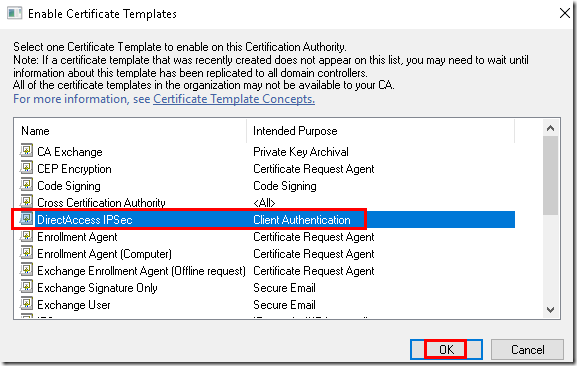
right-click Certificate Templates and choose New and Certificate Template to Issue. Highlight the DirectAccess IPsec certificate template and choose OK
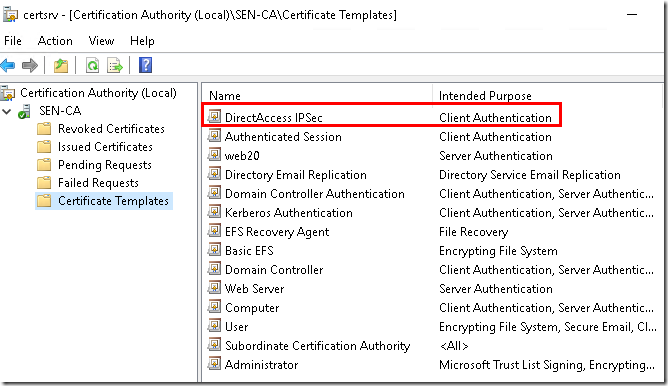
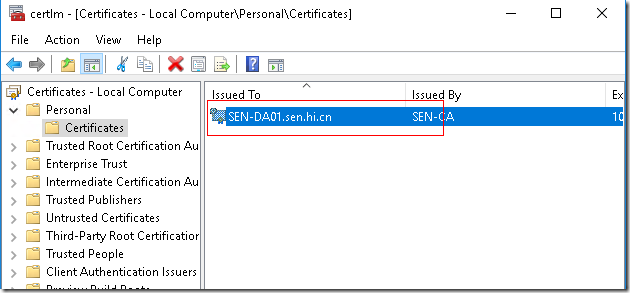
Computer certificates can be requested and installed manually on the DirectAccess server using the Certificates management console snap-in.
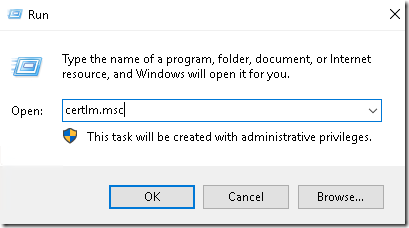
To request a computer certificate, press Window Key + R on the DirectAccess server to bring up the Run command box and enter certlm.msc
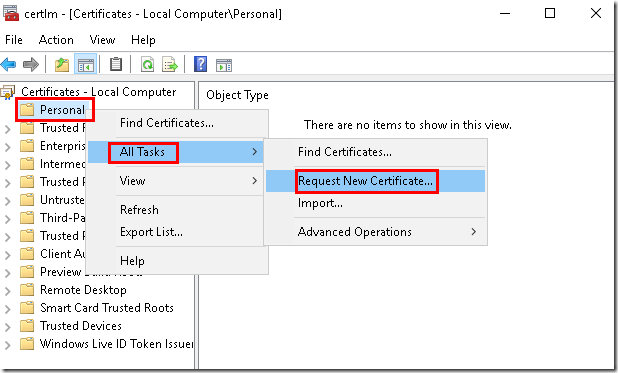
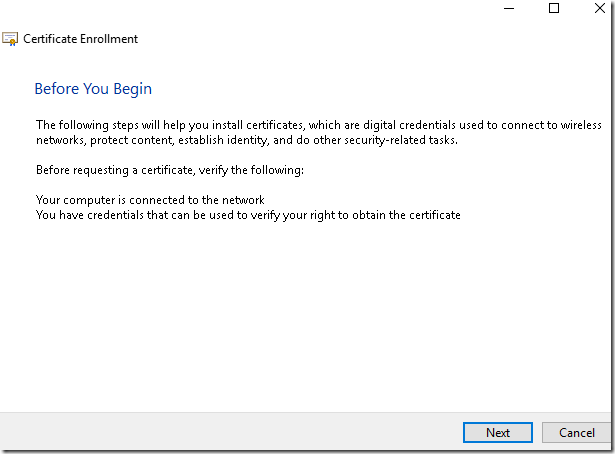
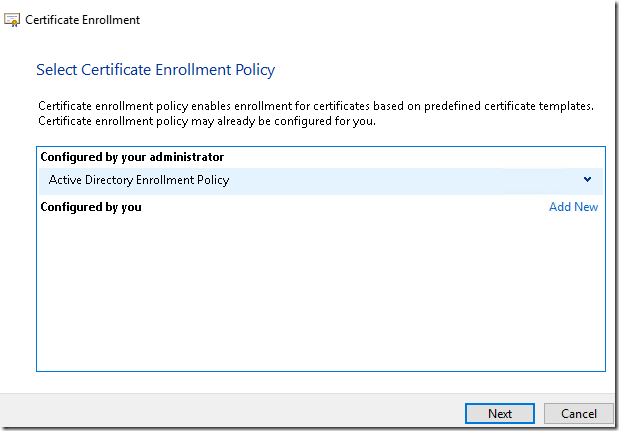
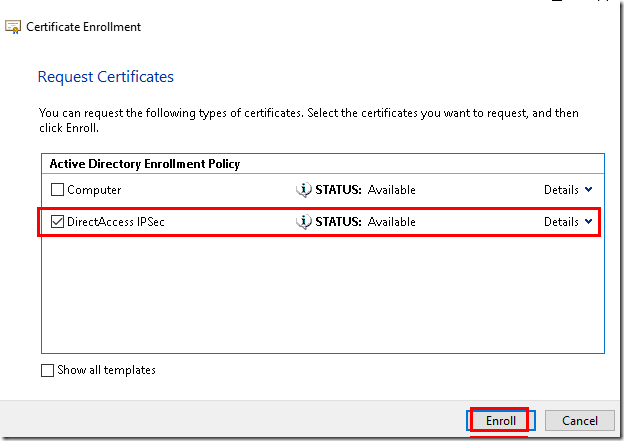
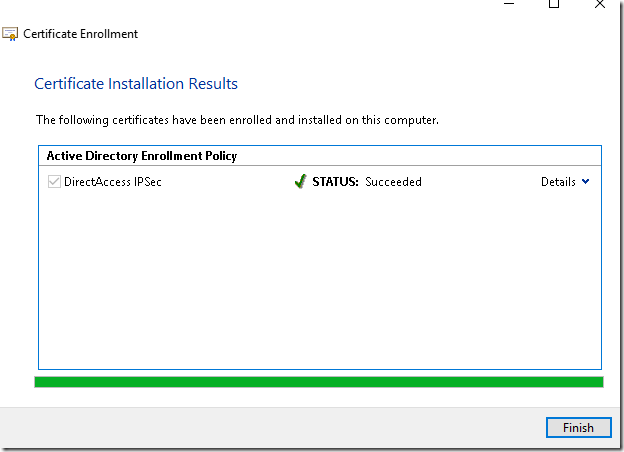
Expand Certificates (Local Computer), right-click Personal, and choose All Tasks and Request New Certificate. Click Next twice, select the DirectAccess IPsec certificate template, and click Enroll
Automatic Enrollment
To the provisioning of certificates for DirectAccess servers and clients, and to ensure that certificates are automatically renewed before they expire it is recommended that certificate auto-enrollment be configured. This is accomplished by creating and deploying a Group Policy Object (GPO) in Active Directory.
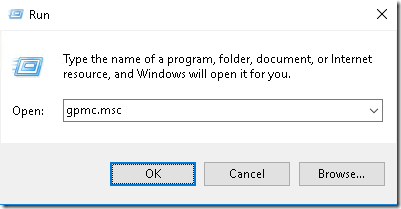
To create and deploy a computer certificate auto-enrollment GPO, open the Group Policy Management console, [Run gpmc.msc] Expand the Forest, Domains, and the domain where the DirectAccess server and clients are joined. Right-click Group Policy Objects and click New. Provide a descriptive name for the new GPO and click OK.
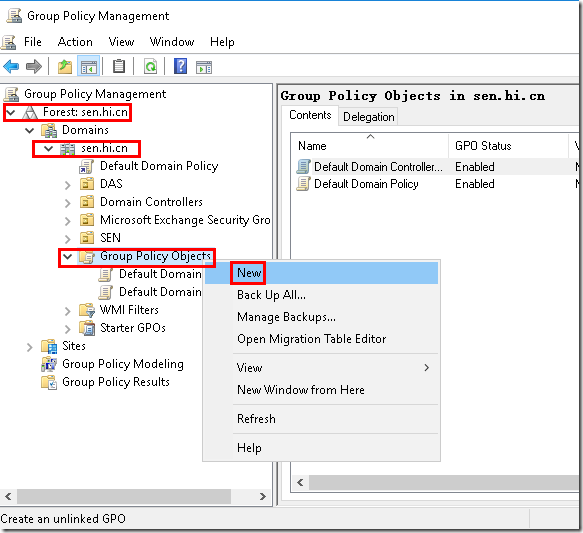
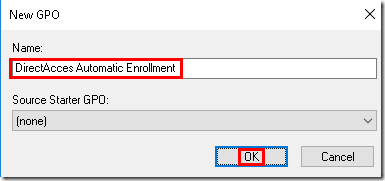
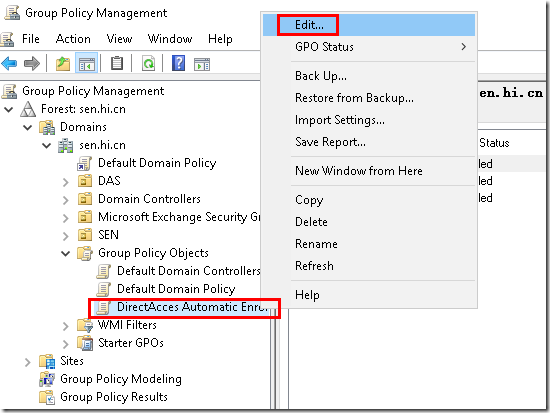
Right-click the newly created GPO and choose Edit. Expand Computer Configuration, Policies, Windows Settings, and Security Settings, and highlight Public Key Policies.
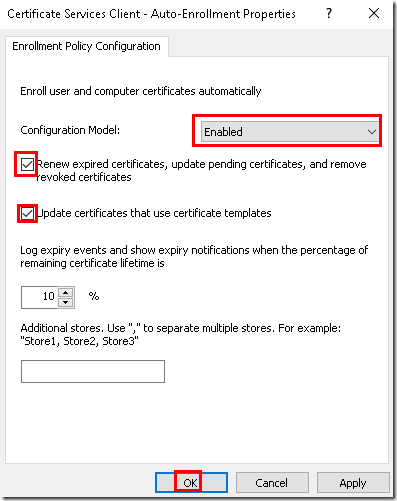
Double-click Certificate Services Client - Auto-Enrollment
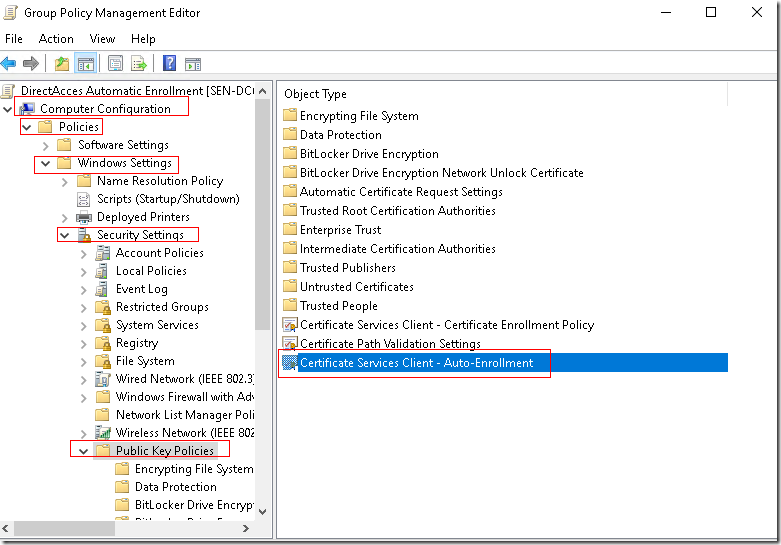
and select Enabled for the Configuration Model. Select the option to Renew expired certificates,update pending certificates, and remove revoked certificates
and Update certificates that use certificate templates and click OK
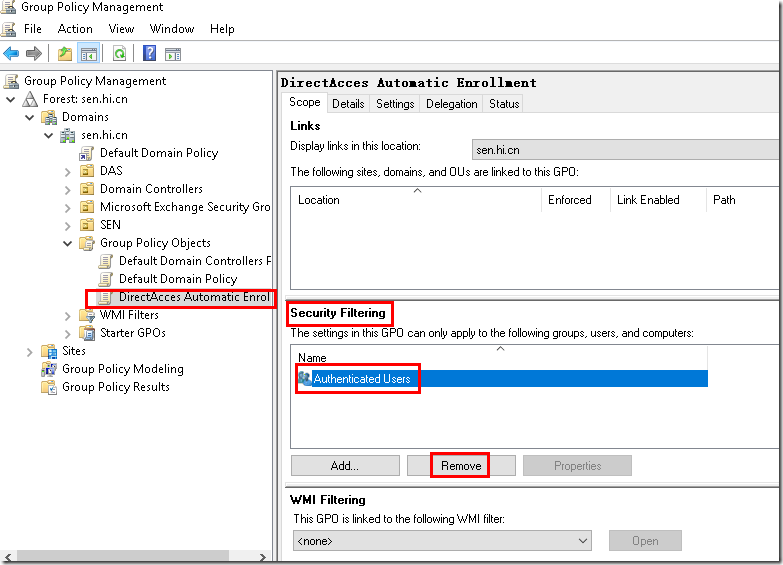
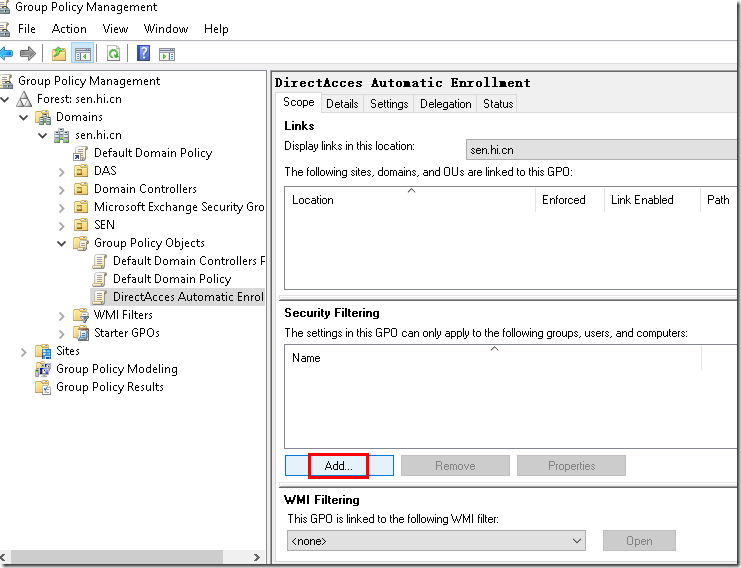
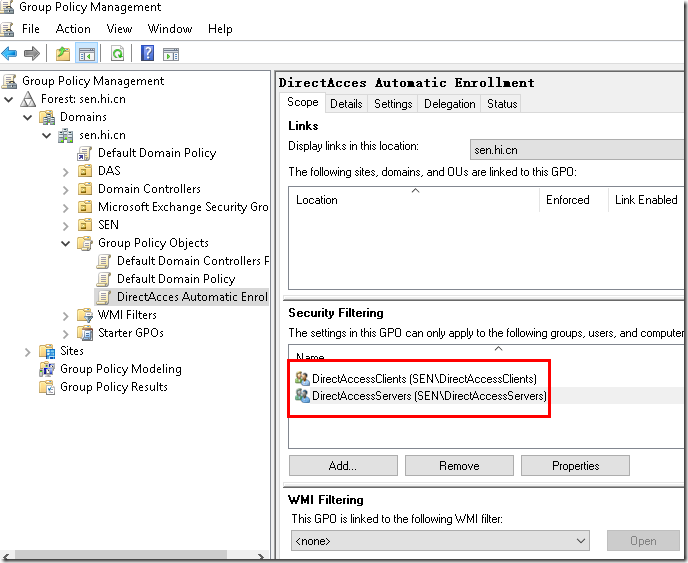
In the Group Policy Management Console, select the GPO and click Add under Security Filtering. Remove Authenticated Users and specify the DirectAccess client security group and all DirectAccess servers (or the DirectAccess servers security group)

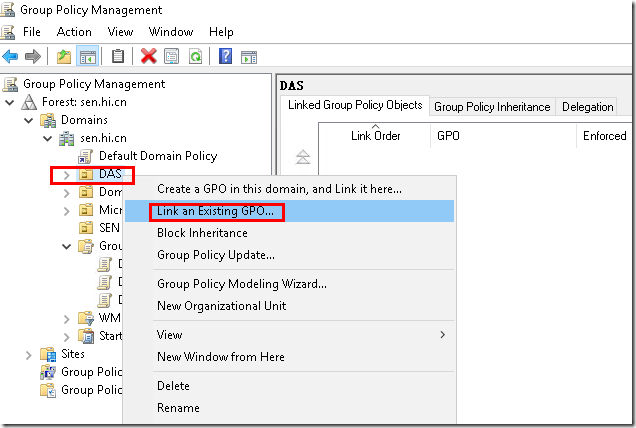
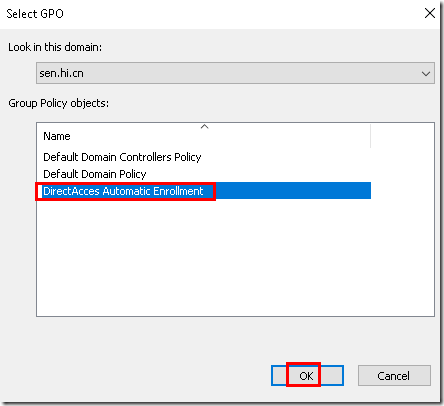
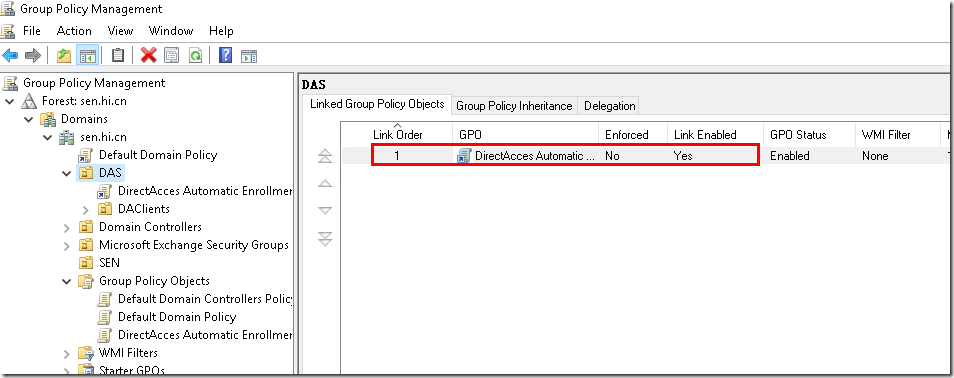
Finally, link the GPO to the domain. Optionally, the GPO can be linked directly to the DirectAccess servers and clients OU, if necessary.
SSL Certificate
An SSL certificate is required for the IP-HTTPS IPv6 transition protocol. It is recommended that the SSL certificate be obtained from a public certificate authority(CA), although the SSL certificate can be issued by the organization’s internal PKI,if an SSL certificate is issued by the organization’s internal PKI and Windows 7 clients are to be supported, the Certificate Revocation List (CRL) must be publicly accessible.
The first step in requesting a public SSL certificate is to generate a Certificate Signing Request (CSR) . This can be accomplished in a variety of ways, including using the Microsoft Management Console (MMC) Certificates snap-in, the certutil.exe commandline tool, and even the Internet Information Services (IIS) management tool:
To obtain an additional certificate for IP-HTTPS
On the DirectAccess server, click Start, click Run, type mmc, and then press ENTER. Click Yes at the User Account Control prompt. 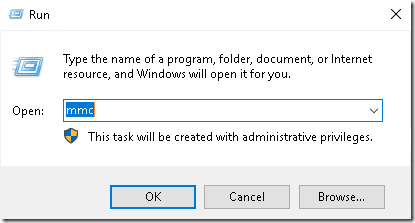
Click File, and then click Add/Remove Snap-ins. 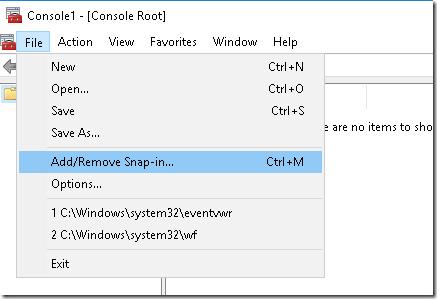
Click Certificates, click Add, click Computer account, click Next, select Local computer, click Finish, and then click OK. 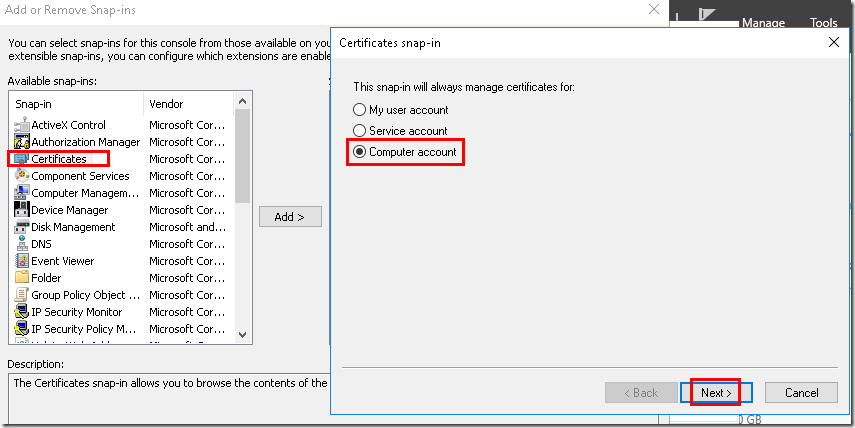
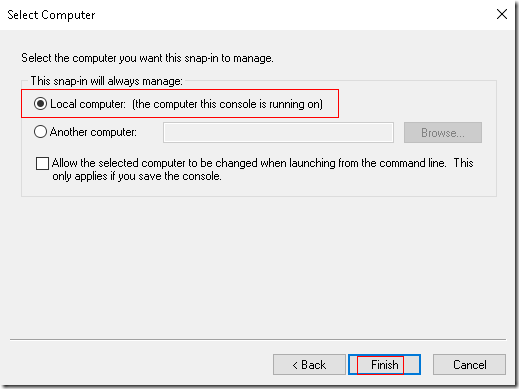
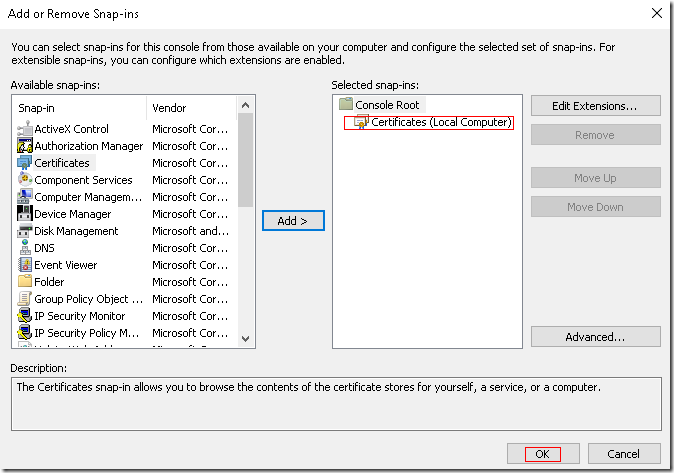
In the console tree of the Certificates snap-in, open Certificates (Local Computer)\Personal\Certificates. 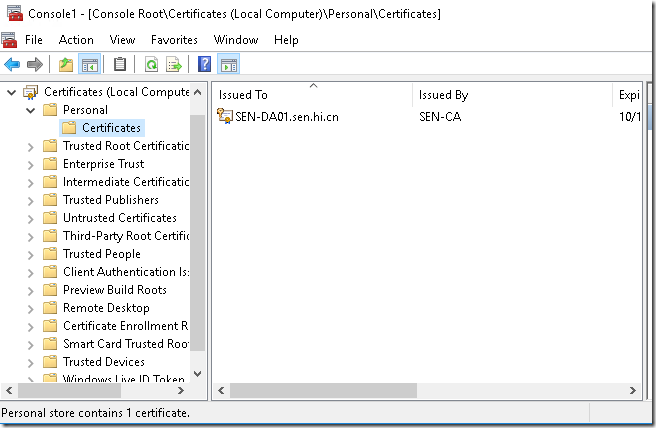
Right-click Certificates, point to All Tasks, and then click Request New Certificate. 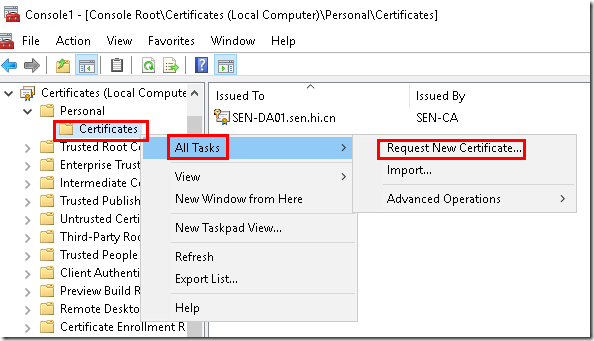
Click Next twice. 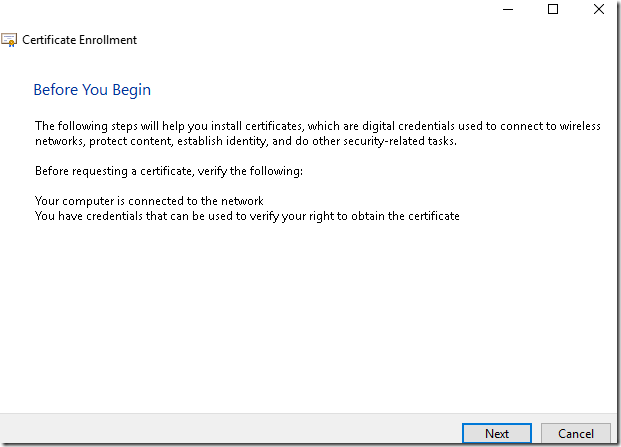
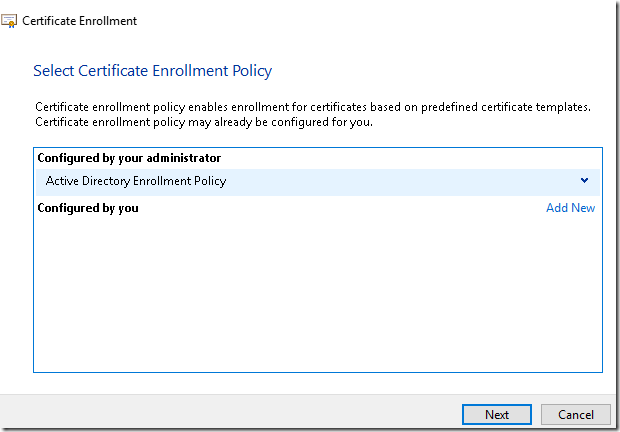
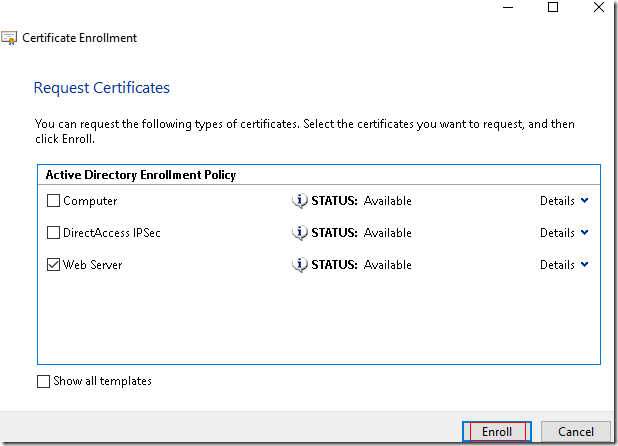
On the Request Certificates page, click the Web Server certificate template, and then click More information is required to enroll for this certificate. 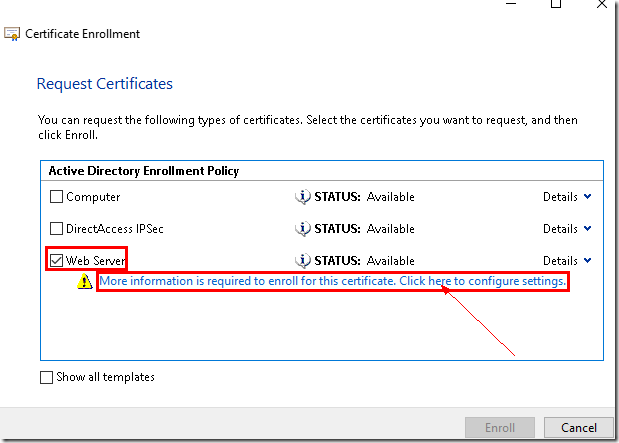
If the Web Server certificate template does not appear, ensure that the DirectAccess server computer account has enroll permissions for the Web Server certificate template. For more information, see Configure Permissions on the Web Server Certificate Template.
To configure permissions for the Web Server certificate template
On the CA computer, click Start,click Run, type certtmpl.msc, and then press ENTER. 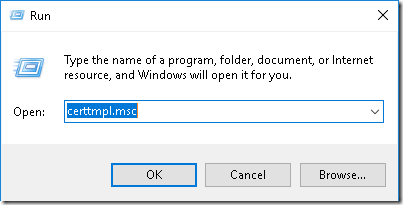
In the contents pane, right-click the Web Server template, and then click Properties. 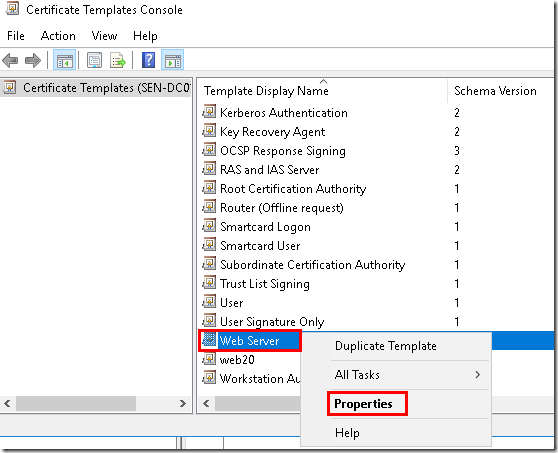
Click the Security tab, and then click Add. 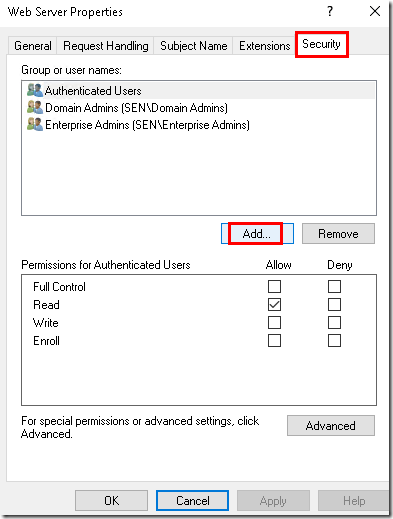
In Enter the object names to select, type the name of the security group that contains the computers that are allowed to request customized certificates, and then click OK.
This security group should contain, at least temporarily when requesting custom certificates, the computer accounts of the DirectAccess server and network location server. As a security best practice, do not use the Authenticated Users group. 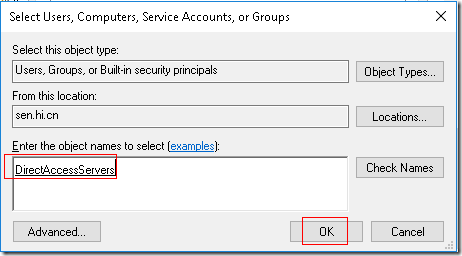
In Permissions, click Enroll under Allow, and then click OK. 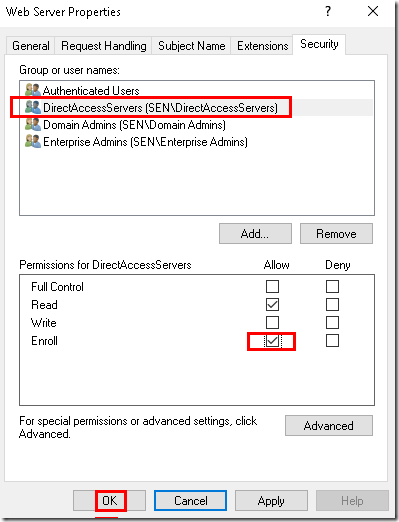
On the Subject tab of the Certificate Properties dialog box, in Subject name, for Type, select Common name. 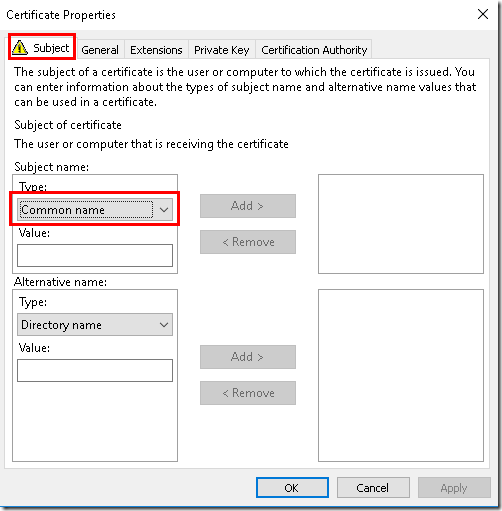
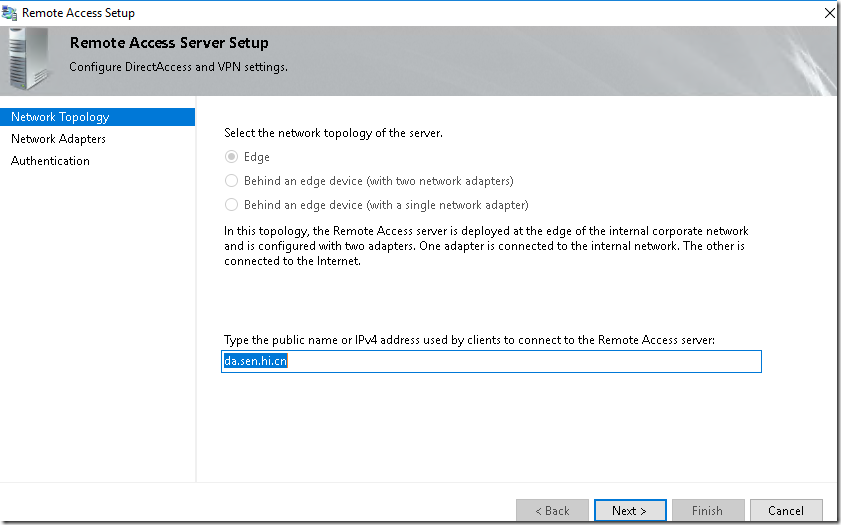
In Value, type the fully qualified domain name (FQDN) of the Internet name of the DirectAccess server (for example,da.sen.hi.cn), and then click Add. 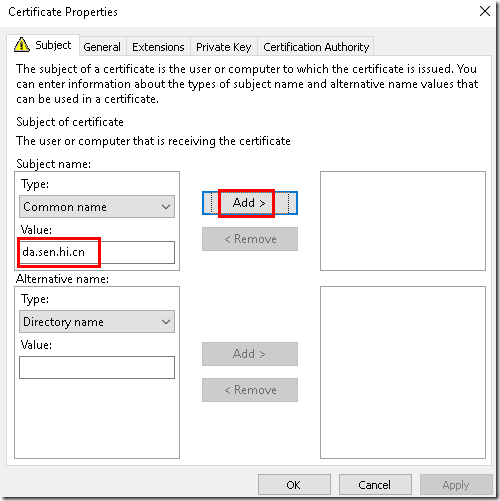
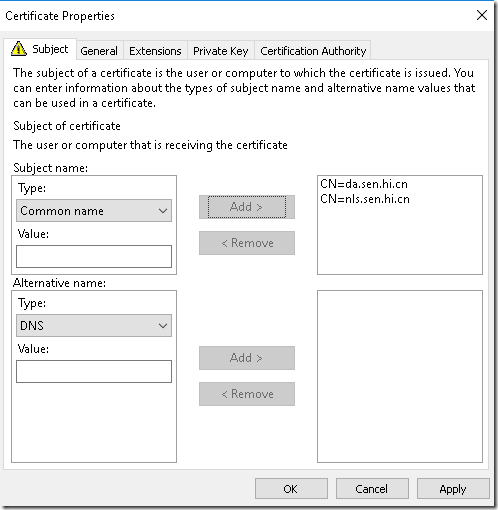
Click OK, click Enroll, and then click Finish. 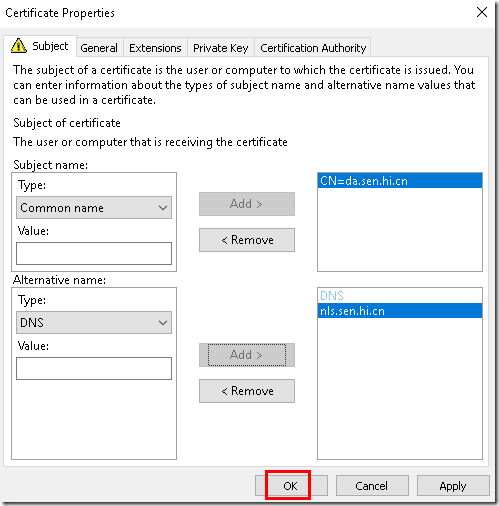
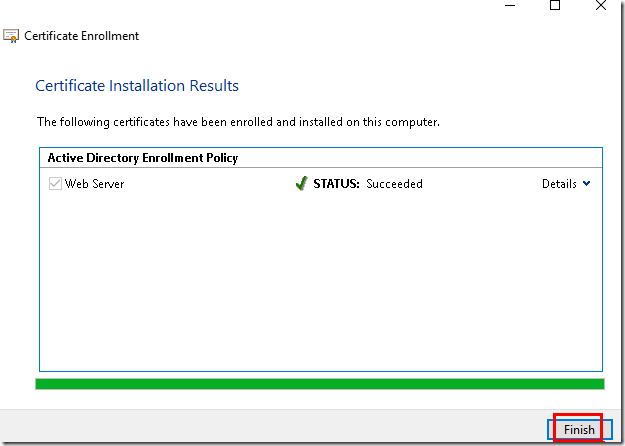
In the details pane of the Certificates snap-in, verify that a new certificate with the FQDN was enrolled with Intended Purposes of Server Authentication. 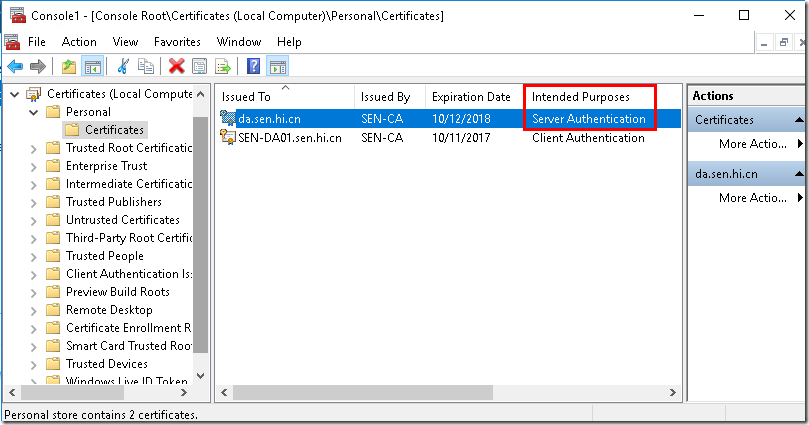
Right-click the certificate, and then click Properties. 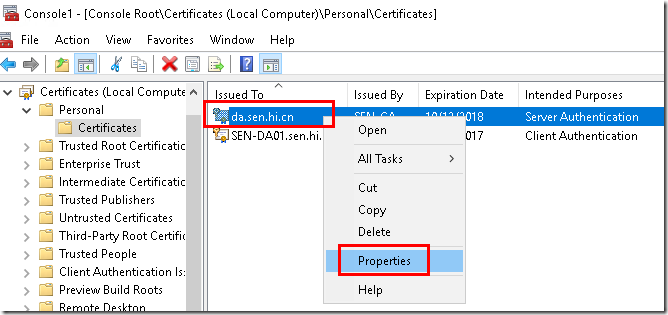
In Friendly Name, type IP-HTTPS Certificate, and then click OK. 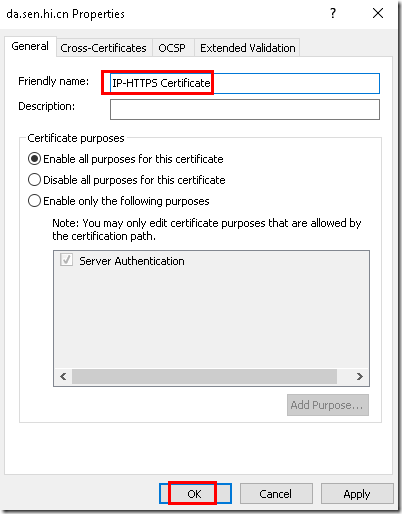
5. Installing the DirectAccess-VPN Role
Installing the DirectAccess-VPN role using PowerShell:
Install-WindowsFeature DirectAccess-VPN -IncludeManagementTools

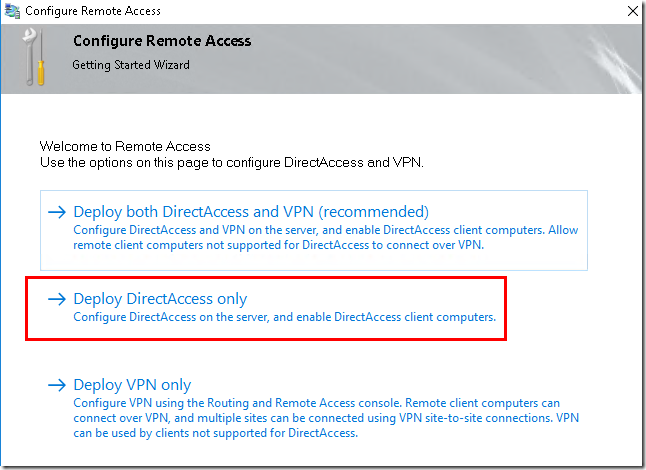
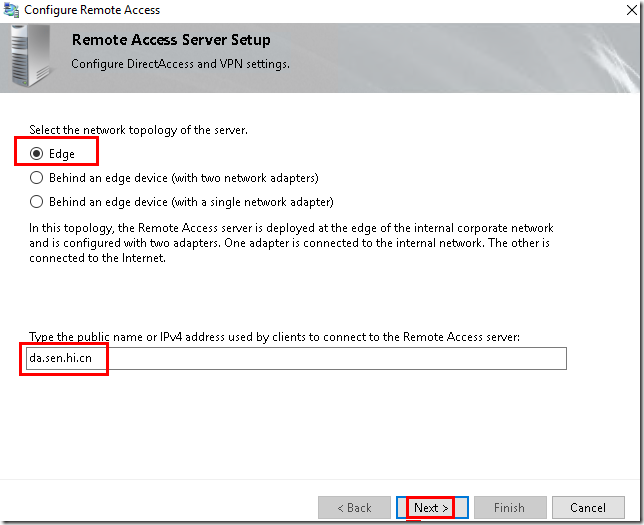
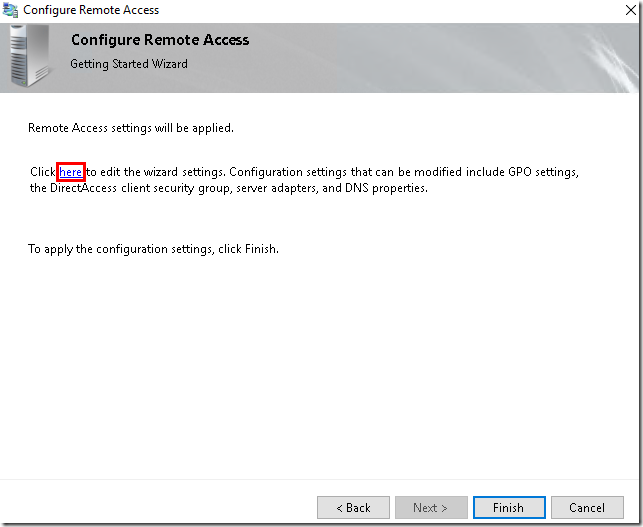
6. Configure DirectAccess with the Getting Started Wizard
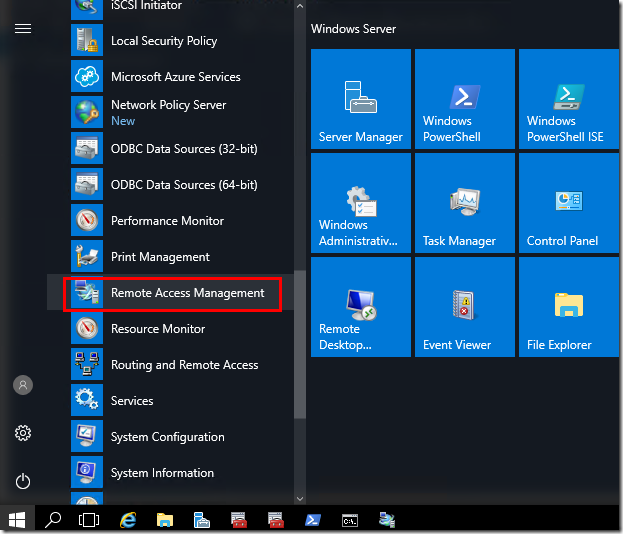
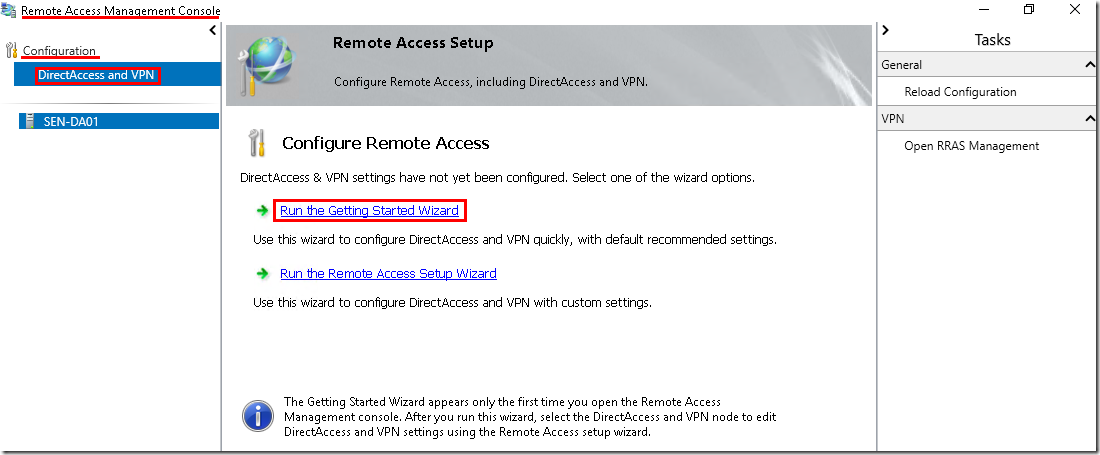
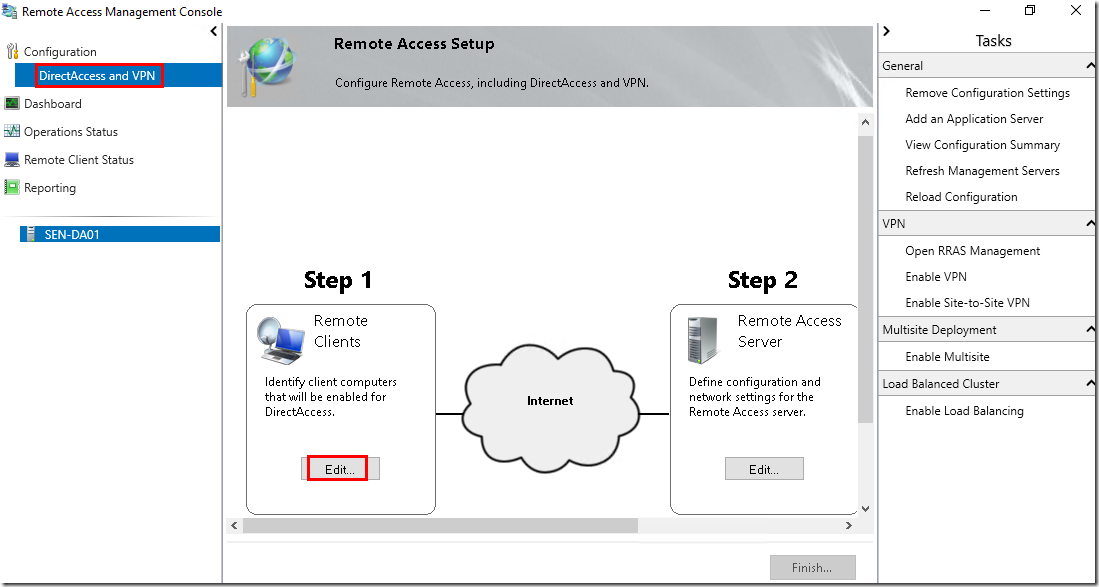
To launch the Getting Started Wizard, open the Remote Access Management Console on the DirectAccess server.
The Remote Access Management Console can be found by clicking on the Start menu and navigating to All Apps ? Windows Administrative Tools ? Remote Access Management Conso le. Expand Configuration, highlight DirectAccess and VPN, and then click Run the Getting Started Wizard: 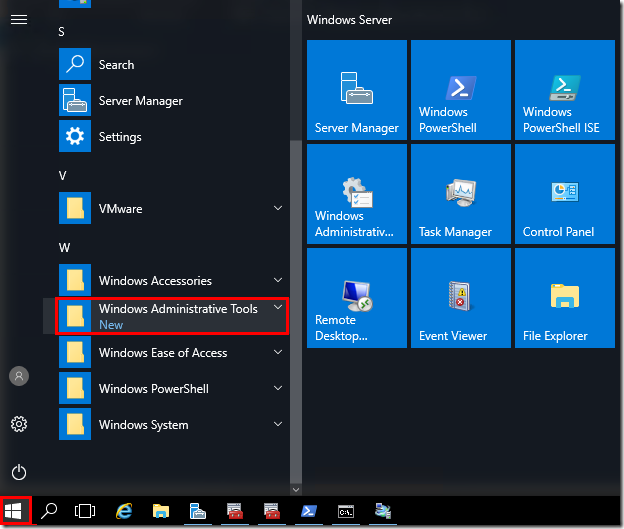
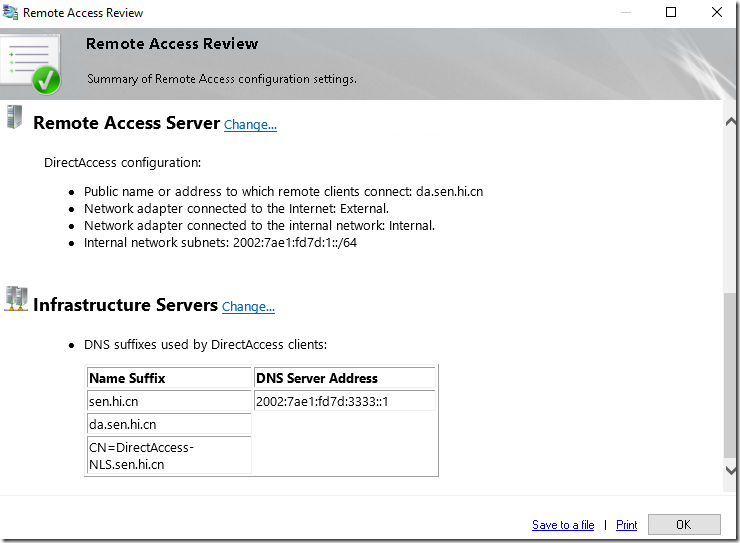
Step 1: Remote Clients
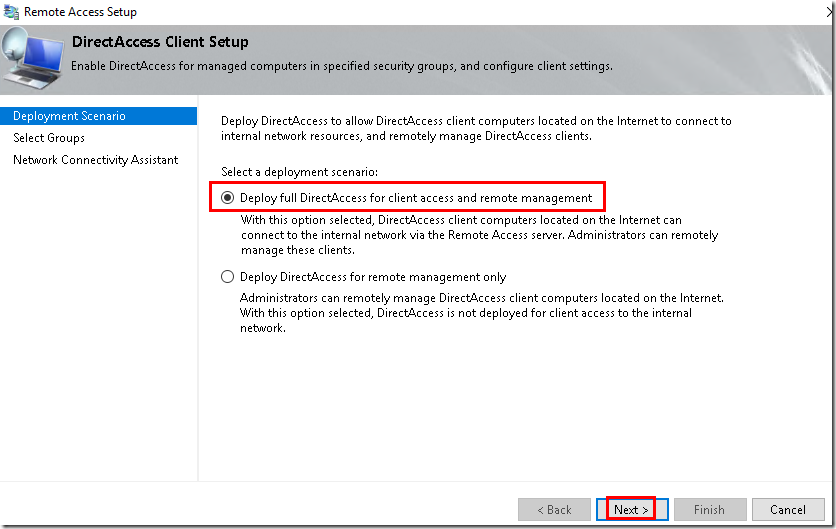
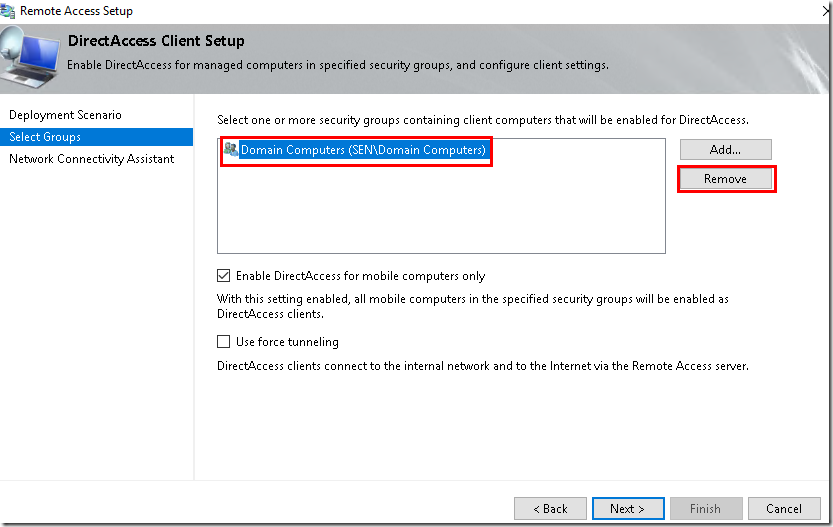
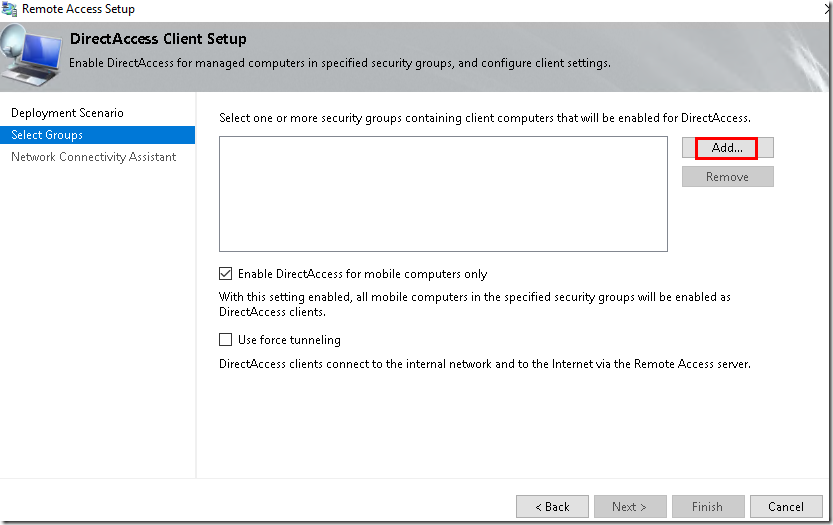
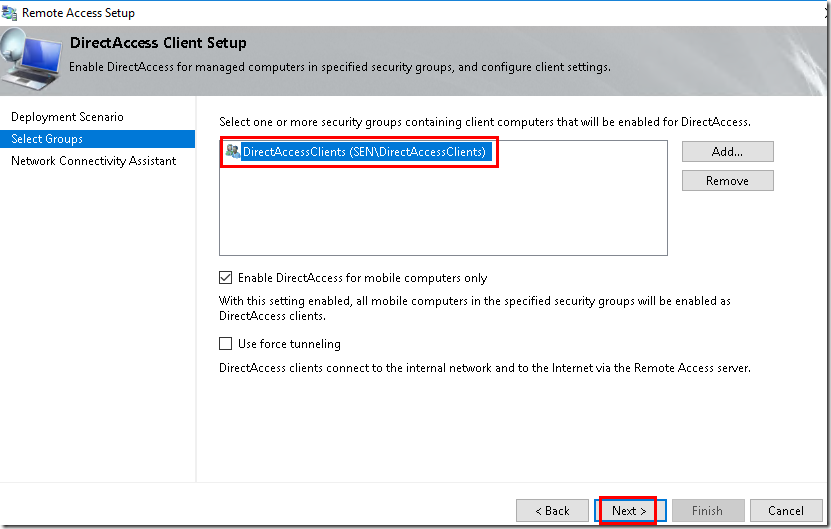
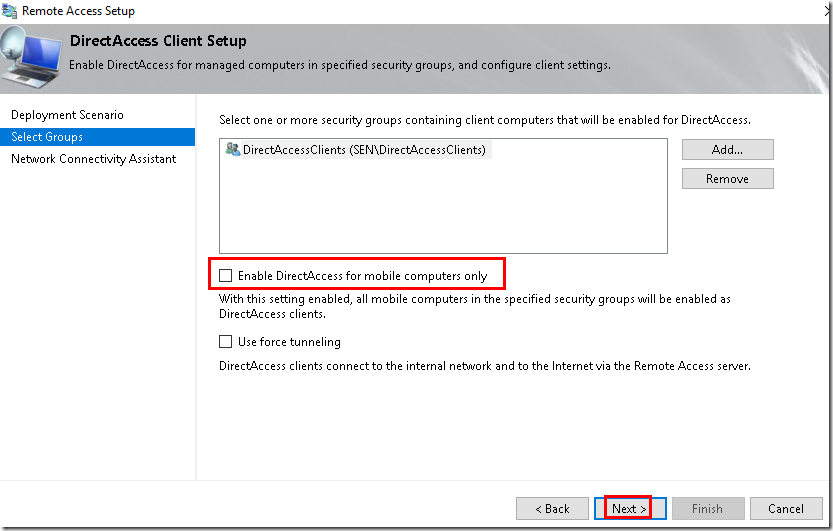
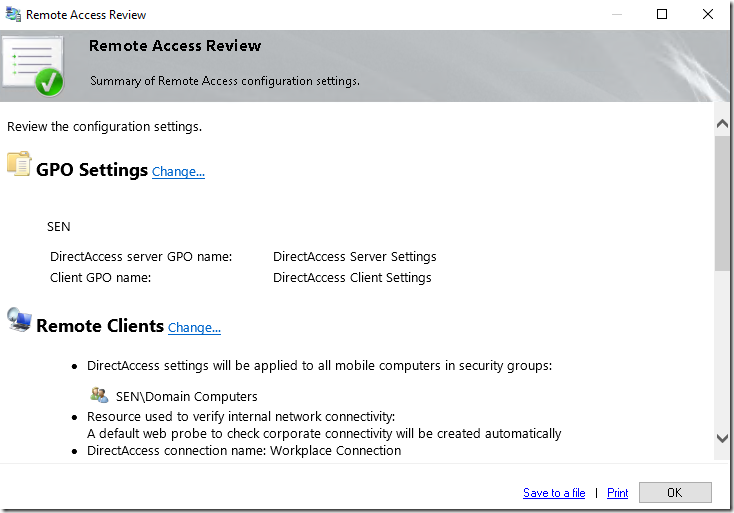
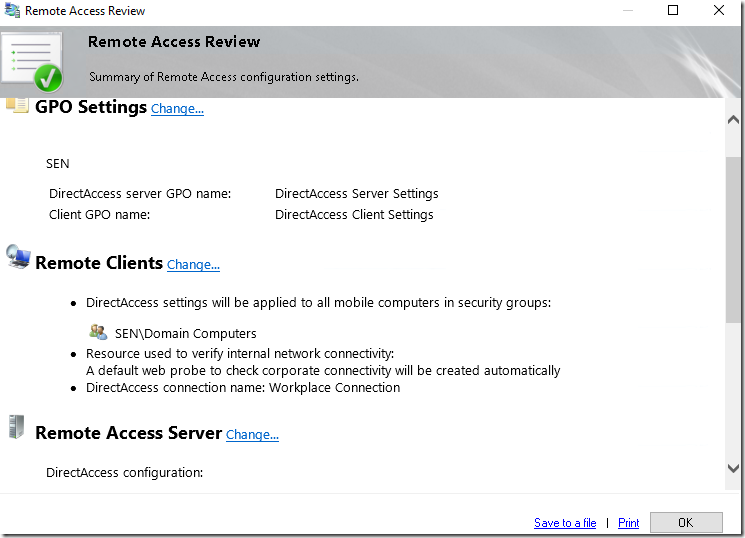
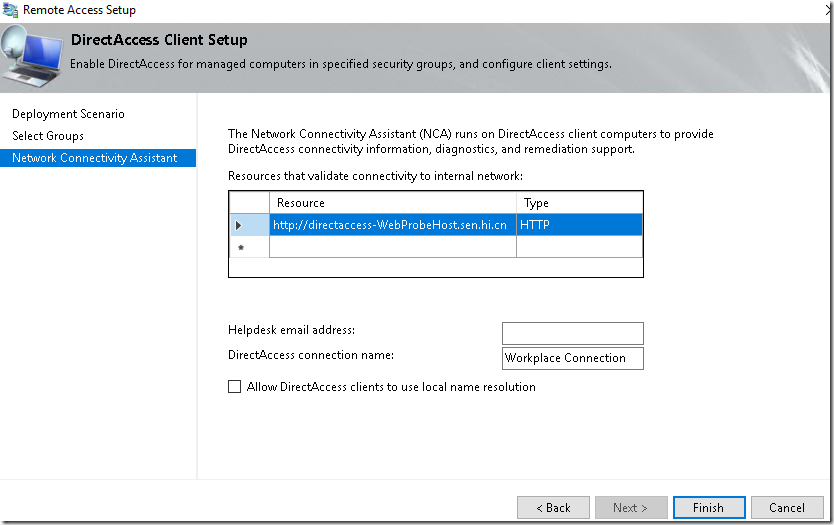
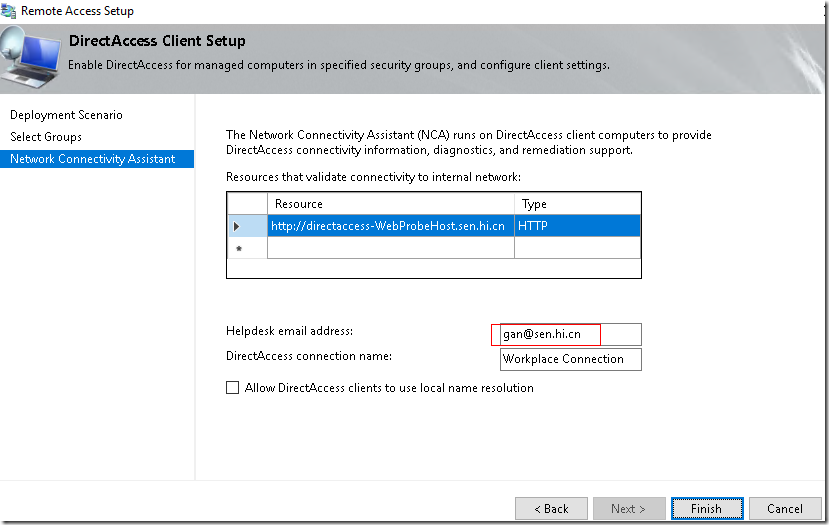
NCA settings apply only to Windows 8.x and Windows 10 clients. These settings are not used by Windows 7 clients.
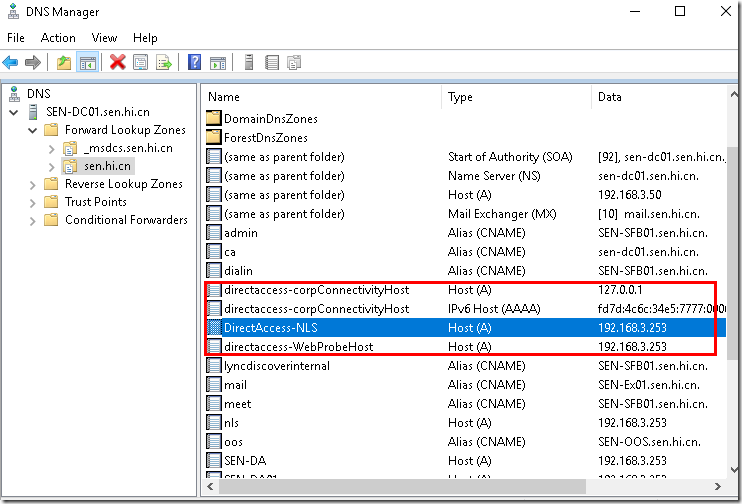
The Resources that validate connectivity to the internal network field is initially blank. Intuitively, information should be supplied here. However, it is not necessary (or recommended) to do so at this time. Resource validation is performed by Windows 8.x and Windows 10 clients by checking connectivity to this URL after the DirectAccess connection is made. During initial configuration, the DirectAccess deployment wizard will automatically populate this field with the URL http://DirectAccess-WebProbeHost.sen.hi.cn, which is hosted on the DirectAccess server (a corresponding host record in DNS resolving to the internal IPv4 address of the DirectAccess server is also configured). This setting can later be changed after the initial configuration has been completed.
auto add dns to the DNS Server:
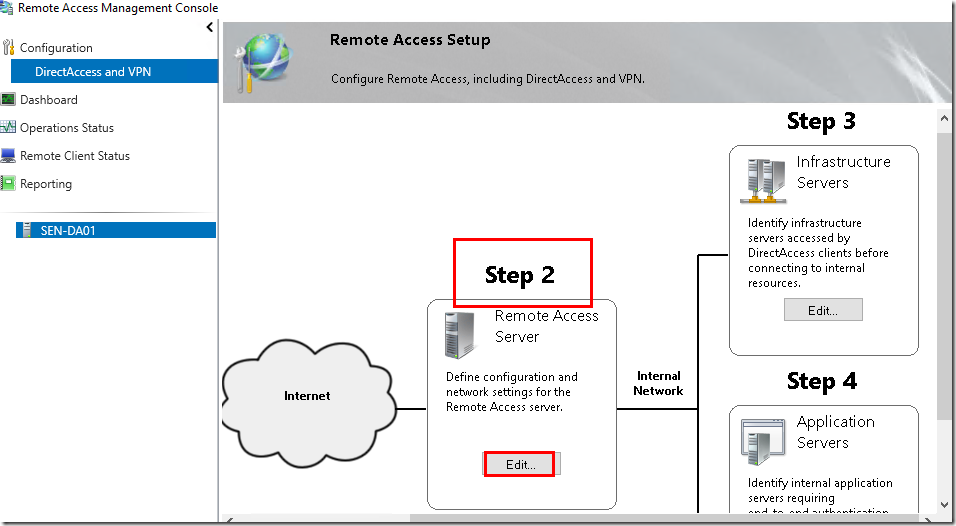
Step 2: Remote Access Server
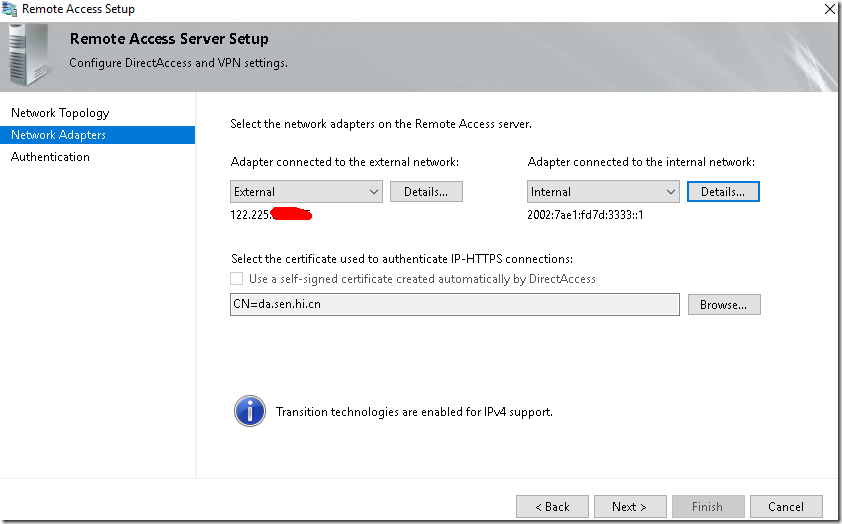
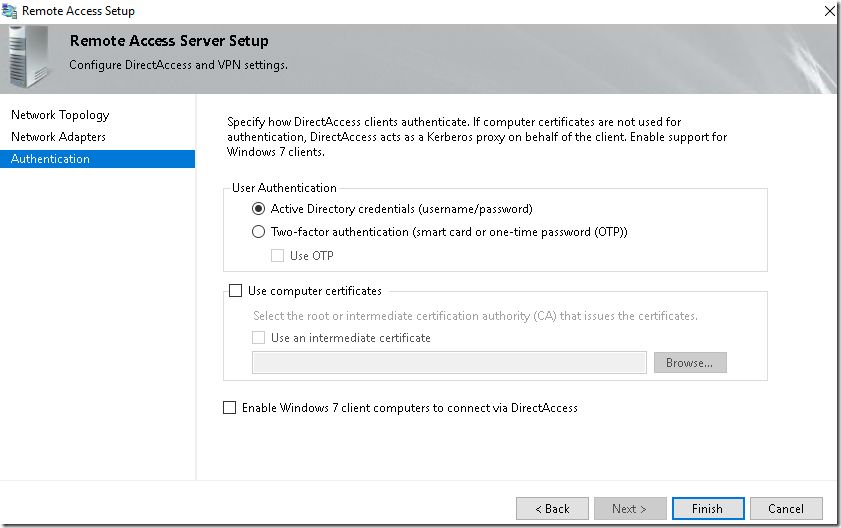
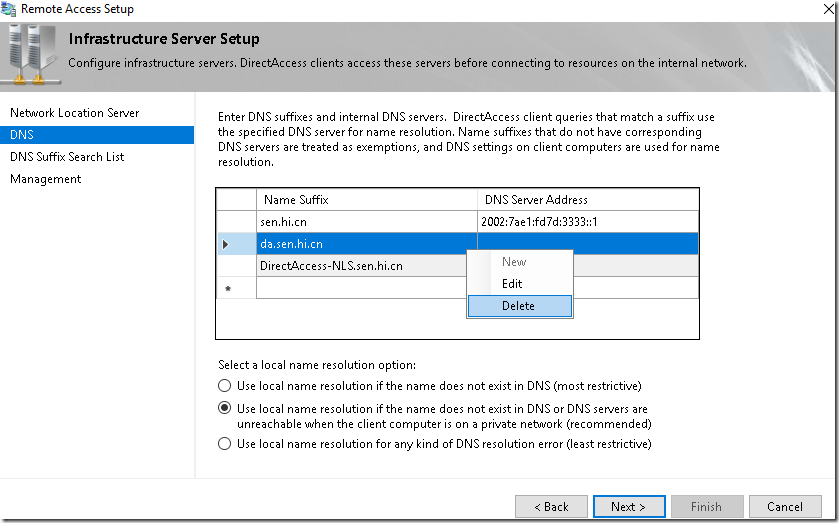
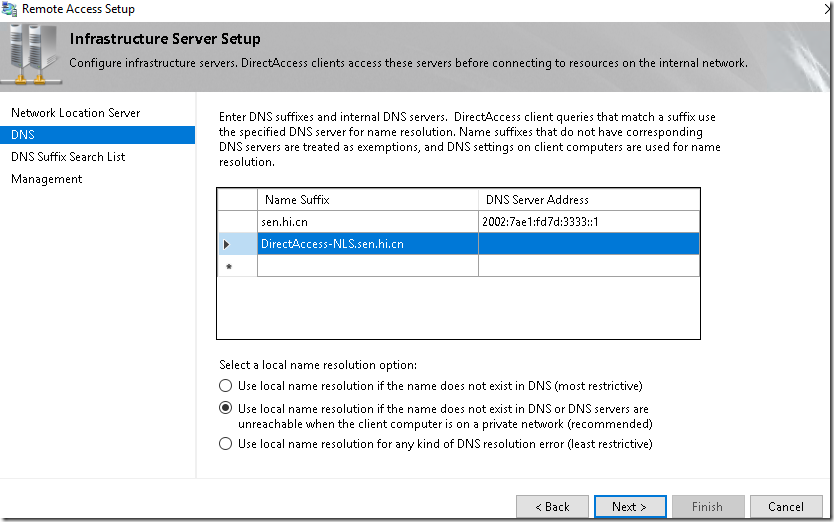
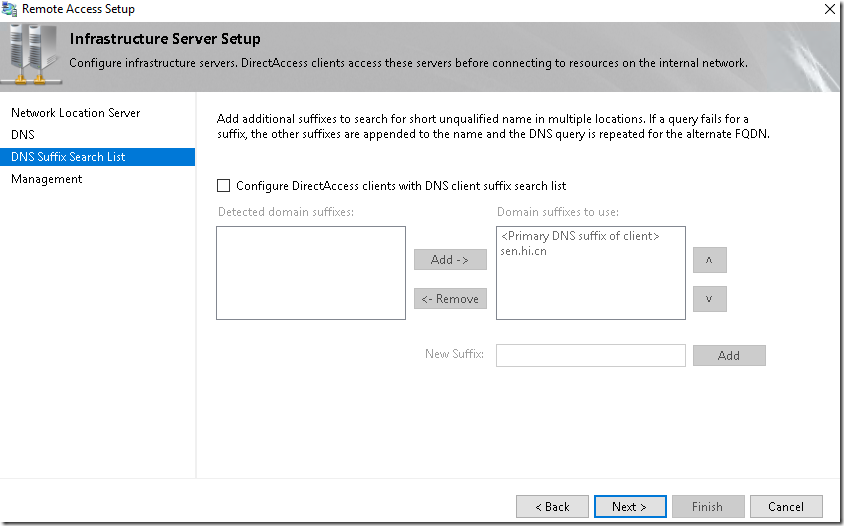
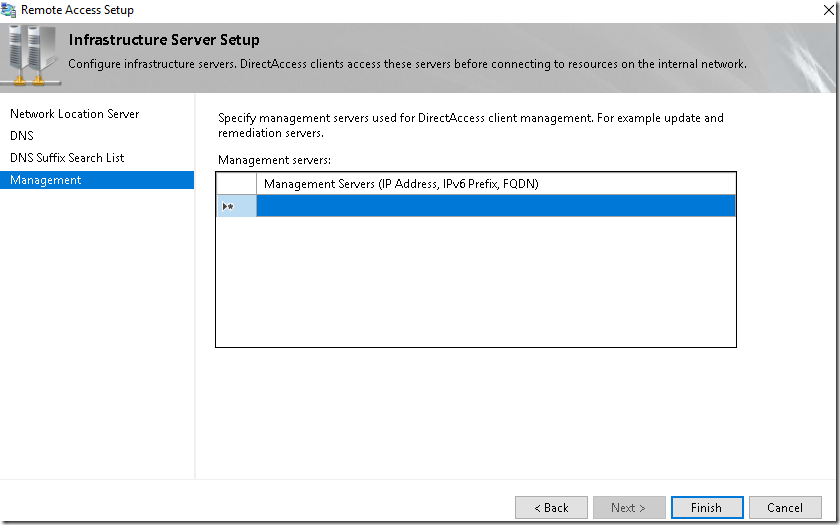
Step 3: Infrastructure Servers
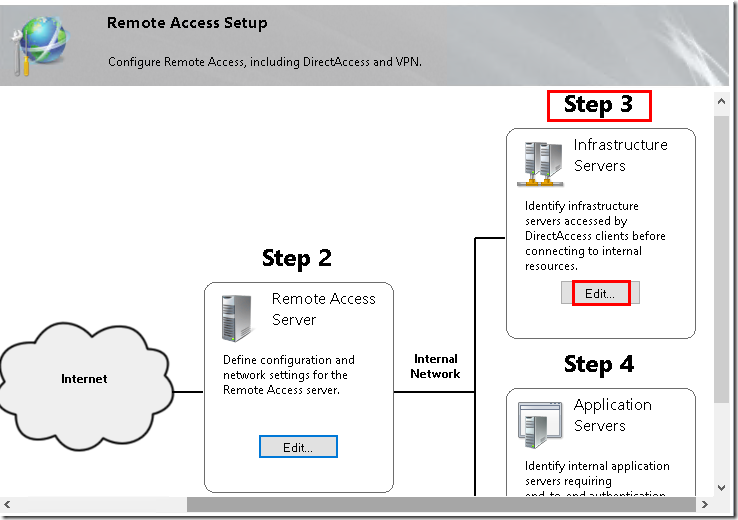
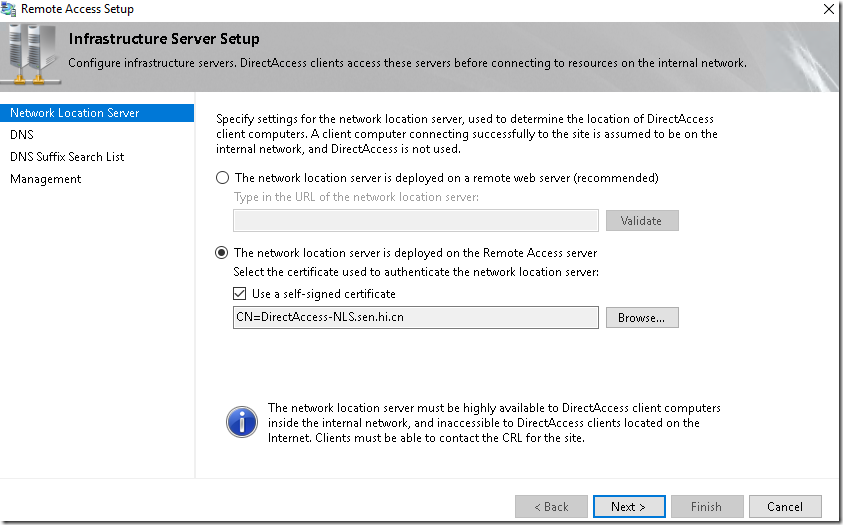
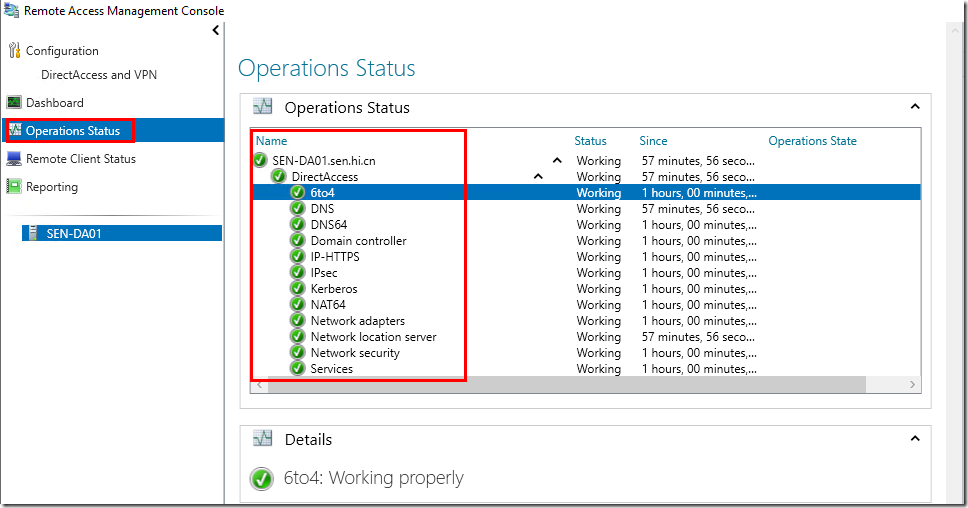
Step 4: Application Servers (Optional)
Step 4 of the Remote Access Setup Wizard is optional. By default, DirectAccess client communication is authenticated and encrypted only between the DirectAccess client and the server.
Communication between the DirectAccess server and hosts on the Internal network is not authenticated or encrypted.
If full end-to-end authentication—and, optionally, encryption—from the DirectAccess server to specific application servers is required, click Edit under Application Servers on Step 4. 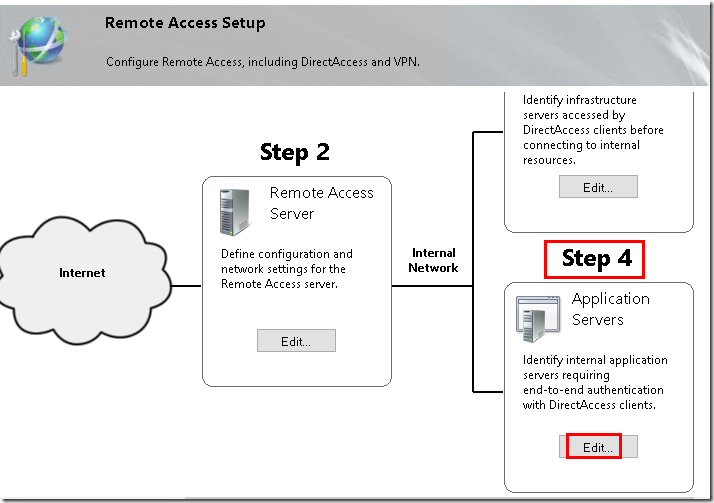
Select the option to Extend authentication to selected application servers, click Add, and specify an Active Directory security group that includes servers requiring end-to-end authentication 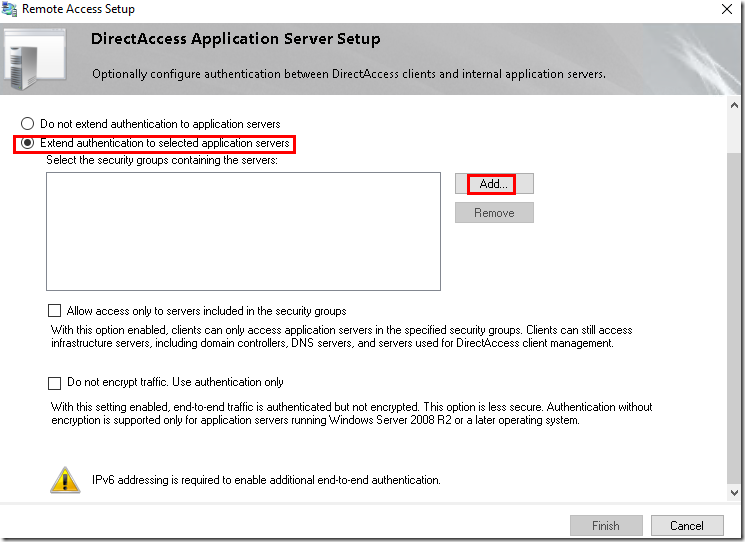
7.Client Configure and test
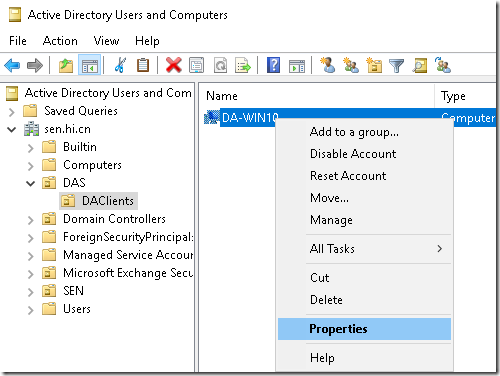
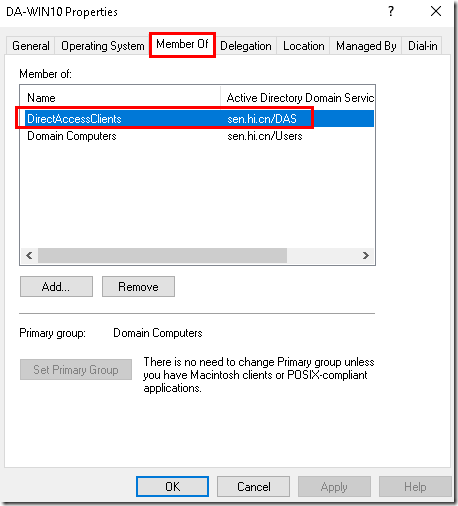
Add to AD:
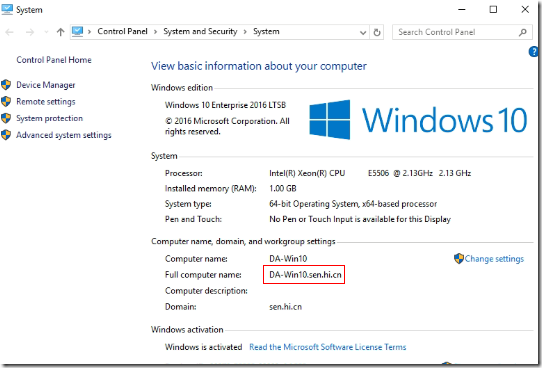
Add-Computer –NewName DA-Win10 –OUPath "OU=DAClients,OU=DAS,DC=sen,DC=hi,DC=cn" –DomainName sen.hi.cn –Restart
Install DirectAccess with Windows Server 2016
标签:windows blank border target style