时间:2021-07-01 10:21:17 帮助过:9人阅读
2.一般MySQL默认的数据库引擎是MyISAM,不支持事务和外键,则可使用支持事务和外键的InnoDB引擎.
3.本笔记着重讲解MySQL的autocommit变量,如何在数据库中设置自动提交,禁止自动提交,如何在对表操作失败后回滚,对表操作成功后提交事务!
二.操作方法
MySQL的autocommit默认是打开的(ON为打开,OFF为关闭或者表示成1为打开,0为关闭)
打开或关闭即是打开自动提交或者关闭自动提交
1.MySQL命令:
方法1:
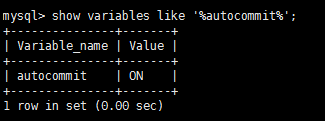
如果是支持事务的引擎,如InnoDB则有系统参数设置是否自动commit,查看参数如下:
mysql> show variables like ‘%autocommit%‘;

显示结果为ON,表示事务自动提交,即不用手工去commit。当然,你可以设置其为OFF,然后自己手工去commit。
打开和关闭自动提交功能命令:
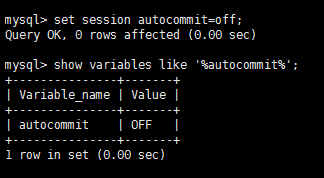
关闭自动提交功能命令
mysql> set session autocommit=OFF;
mysql>
或者
mysql> set session autocommit=off;
Query OK, 0 rows affected (0.00 sec)
mysql>
(注:off不区分大小写)
设置后再次查看:

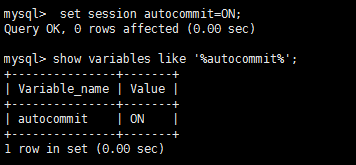
可猜测mysql> set session autocommit=on;应该为打开自动提交功能,不过猜是猜的,最好还是实践下这个命令打开自动提交功能命令
mysql> set session autocommit=ON;
mysql>
设置后再次查看:

注:如果退出MySQL,下次登陆MySQL后autocommit还会自动设置为默认的变量,这里即autocommit为ON,事务自动提交
方法2:
如果你在刚才上面方法中查看参数出现下面的情况:
mysql> show variables like ‘%autocommit%‘;
Empty set (0.00 sec)
mysql>
这个情况在虚拟机上无法查看,在公司的服务器上安装的MySQL就没问题(公司的为MySQL)。
现在关于为什么会出现两种不同的结果,笔者还没解决这个问题,猜测可能是因为数据库版本的不同可能查看的命令不一样,我最终在网上查找到例外的方法在命令下查看和设置autocommit变量。如下:
查看和设置autocommit变量
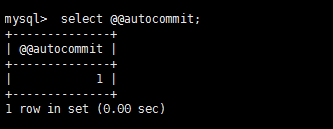
查看autocommit变量
mysql> select @@autocommit;

注:autocommit为1表示打开自动提交
设置autocommit变量
mysql> set session autocommit=off;
Query OK, 0 rows affected (0.00 sec)
mysql> select @@autocommit;
+--------------+
| @@autocommit |
+--------------+
| 0 |
+--------------+
1 row in set (0.00 sec)
mysql>
注:autocommit为0表示关闭自动提交
2.MySQL的配置文件my.cnf:
修改autocommit变量也可以通过修改配置文件my.cnf来关闭autocommit
[mysqld]
init_connect=‘SET autocommit=0‘ //在my.cnf文件[mysqld]下面加上这句。
3.MySQL数据库程序中使用C的API函数:
切换autocommit模式,ON/OFF:
my_bool mysql_autocommit(MYSQL *mysql, my_bool mode)
如果模式为"1",启用autocommit模式;如果模式为"0",禁止autocommit模式.
返回值:如果成功返回0;如果出现错误返回非0值.
回滚当前事务:
my_bool mysql_rollback(MYSQL *mysql)
该函数的动作取决于completion_type系统变量的值.尤其是如果completion_type的值为"2",终结事务后,服务器将执行释放操作,并关闭客户端连接.客户端程序应调用mysql_close(),从客户端一侧关闭连接.
返回值:如果成功返回0;如果出现错误返回非0值.
提交当前事务:
my_bool mysql_commit(MYSQL *mysql)
该函数的动作受completion_type系统变量的值控制.尤其是如果completion_type的值为2,终结事务并关闭客户端连接后,服务器将执行释放操作.
客户端程序应调用mysql_close(),从客户端一侧关闭连接.返回值:如果成功返回0;如果出现错误返回非0值.
三.实例说明:
1.MySQL下命令实例(注:student为我的MySQL数据库test中先前已经创建的一个student表信息):
mysql> select * from student;
+--------+---------+------+
| studno | fname | age |
+--------+---------+------+
| 1 | lsl | 67 |
| 2 | lmy | 22 |
| 3 | sjw | 24 |
| 4 | lwm | 26 |
| 5 | tim | 29 |
| 6 | docker | 30 |
+--------+---------+------+
6 rows in set (0.00 sec)
mysql> select @@autocommit;
+--------------+
| @@autocommit |
+--------------+
| 1 |
+--------------+
1 row in set (0.00 sec)
mysql>
从上面可以看出此时数据库autocommit为1也就是自动提交
下面我想插入一个学生信息学号,名字,年龄分别是7,Nicky,22
mysql> insert into student values (7,"Nicky",22);
Query OK, 1 row affected (0.00 sec)
mysql> select * from student;
+--------+---------+------+
| studno | fname | age |
+--------+---------+------+
| 1 | lsl | 67 |
| 2 | lmy | 22 |
| 3 | sjw | 24 |
| 4 | lwm | 26 |
| 5 | tim | 29 |
| 6 | docker | 30 |
| 7 | Nicky | 22 |
+--------+---------+------+
7 rows in set (0.00 sec)
mysql>
从MySQL插入命令后,执行查询结果可以看出,刚才插入的一条学生记录(7,"Nicky",22)已经插入到表里面,也许你为了保证执行结果确实是这样,你可能先退出MySQL,再次进入MySQL再查询下,出于这样的本能,我
也是这样做的
mysql> exit
Bye
[root@localhost ~]# mysql -uroot -predhat test
Reading table information for completion of table and column names
You can turn off this feature to get a quicker startup with -A
Welcome to the MySQL monitor. Commands end with ; or \g.
Your MySQL connection id is 11 to server version: 5.0.22
Type ‘help;‘ or ‘\h‘ for help. Type ‘\c‘ to clear the buffer.
mysql> select * from student;
+--------+---------+------+
| studno | fname | age |
+--------+---------+------+
| 1 | lsl | 67 |
| 2 | lmy | 22 |
| 3 | sjw | 24 |
| 4 | lwm | 26 |
| 5 | tim | 29 |
| 6 | docker | 30 |
| 7 | Nicky | 22 |
+--------+---------+------+
7 rows in set (0.00 sec)
mysql>
这样可以确信刚才那条学生记录已经确实插入到数据库test的student表里了.
开始主要的环节:
mysql> set session autocommit=off;
Query OK, 0 rows affected (0.00 sec)
mysql> select @@autocommit;
+--------------+
| @@autocommit |
+--------------+
| 0 |
+--------------+
1 row in set (0.00 sec)
mysql>
从上面可以看出此时数据库变量autocommit已经被设置为0也就是禁止自动提交
下面我想插入一个学生信息学号,名字,年龄分别是8,Jerry,21
mysql> insert into student values (8,"Jerry",21);
Query OK, 1 row affected (0.00 sec)
mysql> select * from student;
+--------+---------+------+
| studno | fname | age |
+--------+---------+------+
| 1 | lsl | 67 |
| 2 | lmy | 22 |
| 3 | sjw | 24 |
| 4 | lwm | 26 |
| 5 | tim | 29 |
| 6 | docker | 30 |
| 7 | Nicky | 22 |
| 8 | Jerry | 21 |
+--------+---------+------+
8 rows in set (0.00 sec)
mysql>
从MySQL插入命令后,执行查询结果可以看出,刚才插入的那条学生记录(8,"Jerry",21)也插入到表里面了。
也许你还是为了保证执行结果之外,你可能先退出MySQL,再次进入MySQL再查询下
[root@localhost ~]# mysql -uroot -predhat test
Reading table information for completion of table and column names
You can turn off this feature to get a quicker startup with -A
Welcome to the MySQL monitor. Commands end with ; or \g.
Your MySQL connection id is 12 to server version: 5.0.22
Type ‘help;‘ or ‘\h‘ for help. Type ‘\c‘ to clear the buffer.
mysql> select * from student;
+--------+---------+------+
| studno | fname | age |
+--------+---------+------+
| 1 | lsl | 67 |
| 2 | lmy | 22 |
| 3 | sjw | 24 |
| 4 | lwm | 26 |
| 5 | dcoker | 29 |
| 6 | Cherry | 30 |
| 7 | Nicky | 22 |
+--------+---------+------+
7 rows in set (0.00 sec)
mysql>
可以看出刚才那条学生记录(8,"Jerry",21)没有真正插入数据库test的student表里,这应该就是没有自动提交的效果,
说明了刚才设置变量autocommit为0时后来产生了作用。那么现在你
也许会想,我现在设置了变量autocommit为0,不自动提交执行结果了,
那我应该怎么做才能使我执行的SQL语句还一样对数据库产生影响呢???基于这样的思考和探索下,对于我来说,我刚开始也一无所知,好在
现在网络资源强大,我可以利用百度,google等可以利用的资源, 在网上找到了不少相关的知识介绍
发现了下面两个SQL命令:
mysql> rollback;
mysql> commit;
从字面意思上我们可以猜出了它们的大概意思rollback即回滚,commit即提交.现在回到刚才没有插入成功的那条记录那,为了我能够在数据库
中变量autocommit设置为0的情况下,执行SQL命令也能对数据库产生
影响,那就需要在执行DML的SQL命令后,执行一个commit提交命令
mysql> select @@autocommit;
+--------------+
| @@autocommit |
+--------------+
| 1 |
+--------------+
1 row in set (0.00 sec)
mysql> set session autocommit=off;
Query OK, 0 rows affected (0.00 sec)
mysql> select @@autocommit;
+--------------+
| @@autocommit |
+--------------+
| 0 |
+--------------+
1 row in set (0.00 sec)
mysql> select * from student;
mysql> select * from student;
+--------+---------+------+
| studno | fname | age |
+--------+---------+------+
| 1 | lsl | 67 |
| 2 | lmy | 22 |
| 3 | sjw | 24 |
| 4 | lwm | 26 |
| 5 | dcoker | 29 |
| 6 | Cherry | 30 |
| 7 | Nicky | 22 |
+--------+---------+------+
7 rows in set (0.00 sec)
mysql>
上面为重新设置和查看,可以发现autocommit设置为0
mysql> insert into student values (8,"Jerry",21);
Query OK, 1 row affected (0.00 sec)
mysql> commit;
Query OK, 0 rows affected (0.00 sec)
mysql> select * from student;
+--------+---------+------+
| studno | fname | age |
+--------+---------+------+
| 1 | lsl | 67 |
| 2 | lmy | 22 |
| 3 | sjw | 24 |
| 4 | lwm | 26 |
| 5 | tim | 29 |
| 6 | docker | 30 |
| 7 | Nicky | 22 |
| 8 | Jerry | 21 |
+--------+---------+------+
8 rows in set (0.00 sec)
mysql>
mysql> exit
Bye
[root@localhost ~]# mysql -uroot -predhat test
Reading table information for completion of table and column names
You can turn off this feature to get a quicker startup with -A
Welcome to the MySQL monitor. Commands end with ; or \g.
Your MySQL connection id is 13 to server version: 5.0.22
Type ‘help;‘ or ‘\h‘ for help. Type ‘\c‘ to clear the buffer.
mysql> select * from student;
+--------+---------+------+
| studno | fname | age |
+--------+---------+------+
| 1 | lsl | 67 |
| 2 | lmy | 22 |
| 3 | sjw | 24 |
| 4 | lwm | 26 |
| 5 | tim | 29 |
| 6 | docker | 30 |
| 7 | Nicky | 22 |
| 8 | Jerry | 21 |
+--------+---------+------+
8 rows in set (0.00 sec)
mysql>
这样可以确信刚才那条学生记录(8,"Jerry",21)已经确实插入到数据库test的student表里了.
总结:在数据库中autocommit设置为0的情况下,所有的SQL执行命令的结果在遇到commit命令之后才真正提交到数据库中。也许到这会你发现我刚才说了两个SQL命令,到现在只说了commit命令,还有个rollback
命令怎么用呢?
继续rollback命令
现在我想把数据库test的student表里名字为"Sunrier"这个小朋友的信息删除了。
mysql> select @@autocommit;
+--------------+
| @@autocommit |
+--------------+
| 1 |
+--------------+
1 row in set (0.00 sec)
mysql> set session autocommit=off;
Query OK, 0 rows affected (0.00 sec)
mysql> select @@autocommit;
+--------------+
| @@autocommit |
+--------------+
| 0 |
+--------------+
1 row in set (0.00 sec)
mysql> select * from student;
+--------+---------+------+
| studno | fname | age |
+--------+---------+------+
| 1 | lsl | 67 |
| 2 | lmy | 22 |
| 3 | sjw | 24 |
| 4 | lwm | 26 |
| 5 | tim | 29 |
| 6 | docker | 30 |
| 7 | Nicky | 22 |
| 8 | Jerry | 21 |
+--------+---------+------+8 rows in set (0.00 sec)
mysql> delete from student where fname = "Sunrier";
Query OK, 1 row affected (0.01 sec)
mysql> select * from student;
+--------+---------+------+
| studno | fname | age |
+--------+---------+------+
| 1 | lsl | 67 |
| 2 | lmy | 22 |
| 3 | sjw | 24 |
| 4 | lwm | 26 |
| 5 | tim | 29 |
| 6 | docker | 30 |
| 7 | Nicky | 22 |
+--------+---------+------+
7 rows in set (0.00 sec)
mysql>
从表里面可以看到名字为"Sunrier"的信息删除了,也许你可能马上后悔自己的选择,我找不到任何理由删除"Sunrier",这个小朋友,马上我着急了,
我该如何找到该小朋友的原始信息呢,于是你眼前一亮,rollback这个命令,回滚,按照日常的用语是不是回过去的意思.于是你查询了下相关资料,好像可以哎,于是决定自己试试这个SQL命令
mysql> rollback;
Query OK, 0 rows affected (0.00 sec)
mysql> select * from student;
+--------+---------+------+
| studno | fname | age |
+--------+---------+------+
| 1 | lsl | 67 |
| 2 | lmy | 22 |
| 3 | sjw | 24 |
| 4 | lwm | 26 |
| 5 | tim | 29 |
| 6 | docker | 30 |
| 7 | Nicky | 22 |
| 8 | Jerry | 21 |
+--------+---------+------+
8 rows in set (0.00 sec)
mysql>
为了再次确认,退出MySQL后重新查看
mysql> exit
Bye
[root@localhost ~]# mysql -uroot -predhat test
Reading table information for completion of table and column names
You can turn off this feature to get a quicker startup with -A
Welcome to the MySQL monitor. Commands end with ; or \g.
Your MySQL connection id is 13 to server version: 5.0.22
Type ‘help;‘ or ‘\h‘ for help. Type ‘\c‘ to clear the buffer.
mysql> select * from student;
+--------+---------+------+
| studno | fname | age |
+--------+---------+------+
| 1 | lsl | 67 |