时间:2021-07-01 10:21:17 帮助过:4人阅读
cd /data/packages/src
tar -zxvf ../cmake-3.2.3.tar.gz
cd cmake-3.2.3/
./bootstrap
gmake
make install
cd ../
tar xf  mysql-5.6.34.tar.gz
cd mysql-5.6.34
cmake . -DCMAKE_INSTALL_PREFIX=/usr/local/mysql -DSYSCONFDIR=/etc -DWITH_SSL=bundled -DDEFAULT_CHARSET=utf8 -DDEFAULT_COLLATION=utf8_general_ci -DWITH_INNOBASE_STORAGE_ENGINE=1 -DWITH_MYISAM_STORAGE_ENGINE=1 -DMYSQL_TCP_PORT=3306 -DMYSQL_UNIX_ADDR=/tmp/mysql.sock -DMYSQL_DATADIR=/usr/local/mysql/data
make && make install

cp support-files/mysql.server /etc/rc.d/init.d/mysqld

[client]
port = 3306
socket = /tmp/mysql.sock

[mysqld]
basedir = /usr/local/mysql
port = 3306
socket = /tmp/mysql.sock
datadir = /usr/local/mysql/data
pid-file = /usr/local/mysql/data/mysql.pid
log-error = /usr/local/mysql/data/mysql.err

server-id = 1
auto_increment_offset = 1
auto_increment_increment = 2                                            #奇数ID

log-bin = mysql-bin                                                     #打开二进制功能,MASTER主服务器必须打开此项
binlog-format=ROW
binlog-row-p_w_picpath=minimal
log-slave-updates=true
gtid-mode=on
enforce-gtid-consistency=true
master-info-repository=TABLE
relay-log-info-repository=TABLE
sync-master-info=1
slave-parallel-workers=0
sync_binlog=0
binlog-checksum=CRC32
master-verify-checksum=1
slave-sql-verify-checksum=1
binlog-rows-query-log_events=1
#expire_logs_days=5
max_binlog_size=1024M                                                   #binlog单文件最大值

replicate-ignore-db = mysql                                             #忽略不同步主从的数据库
replicate-ignore-db = information_schema
replicate-ignore-db = performance_schema
replicate-ignore-db = test
replicate-ignore-db = zabbix

max_connections = 3000
max_connect_errors = 30

skip-character-set-client-handshake                                     #忽略应用程序想要设置的其他字符集
init-connect=‘SET NAMES utf8‘                                           #连接时执行的SQL
character-set-server=utf8                                               #服务端默认字符集
wait_timeout=1800                                                       #请求的最大连接时间
interactive_timeout=1800                                                #和上一参数同时修改才会生效
sql_mode=NO_ENGINE_SUBSTITUTION,STRICT_TRANS_TABLES                     #sql模式
max_allowed_packet = 10M
bulk_insert_buffer_size = 8M
query_cache_type = 1
query_cache_size = 128M
query_cache_limit = 4M
key_buffer_size = 256M
read_buffer_size = 16K

skip-name-resolve
slow_query_log=1
long_query_time = 6
slow_query_log_file=slow-query.log
innodb_flush_log_at_trx_commit = 2
innodb_log_buffer_size = 16M

[mysql]
no-auto-rehash

[myisamchk]
key_buffer_size = 20M
sort_buffer_size = 20M
read_buffer = 2M
write_buffer = 2M

[mysqlhotcopy]
interactive-timeout

[mysqldump]
quick
max_allowed_packet = 16M

[mysqld_safe]

log-slave-updates = true #将复制事件写入binlog,一台服务器既做主库又做从库此选项必须要开启
#masterA自增长ID
auto_increment_offset = 1
auto_increment_increment = 2                                            #奇数ID
#masterB自增加ID
auto_increment_offset = 2
auto_increment_increment = 2                                            #偶数ID

[client]
port = 3306
socket = /tmp/mysql.sock

[mysqld]
basedir = /usr/local/mysql
port = 3306
socket = /tmp/mysql.sock
datadir = /usr/local/mysql/data
pid-file = /usr/local/mysql/data/mysql.pid
log-error = /usr/local/mysql/data/mysql.err

server-id = 2
auto_increment_offset = 2
auto_increment_increment = 2                                            #偶数ID

log-bin = mysql-bin                                                     #打开二进制功能,MASTER主服务器必须打开此项
binlog-format=ROW
binlog-row-p_w_picpath=minimal
log-slave-updates=true
gtid-mode=on
enforce-gtid-consistency=true
master-info-repository=TABLE
relay-log-info-repository=TABLE
sync-master-info=1
slave-parallel-workers=0
sync_binlog=0
binlog-checksum=CRC32
master-verify-checksum=1
slave-sql-verify-checksum=1
binlog-rows-query-log_events=1
#expire_logs_days=5
max_binlog_size=1024M                                                   #binlog单文件最大值

replicate-ignore-db = mysql                                             #忽略不同步主从的数据库
replicate-ignore-db = information_schema
replicate-ignore-db = performance_schema
replicate-ignore-db = test
replicate-ignore-db = zabbix

max_connections = 3000
max_connect_errors = 30

skip-character-set-client-handshake                                     #忽略应用程序想要设置的其他字符集
init-connect=‘SET NAMES utf8‘                                           #连接时执行的SQL
character-set-server=utf8                                               #服务端默认字符集
wait_timeout=1800                                                       #请求的最大连接时间
interactive_timeout=1800                                                #和上一参数同时修改才会生效
sql_mode=NO_ENGINE_SUBSTITUTION,STRICT_TRANS_TABLES                     #sql模式
max_allowed_packet = 10M
bulk_insert_buffer_size = 8M
query_cache_type = 1
query_cache_size = 128M
query_cache_limit = 4M
key_buffer_size = 256M
read_buffer_size = 16K

skip-name-resolve
slow_query_log=1
long_query_time = 6
slow_query_log_file=slow-query.log
innodb_flush_log_at_trx_commit = 2
innodb_log_buffer_size = 16M

[mysql]
no-auto-rehash

[myisamchk]
key_buffer_size = 20M
sort_buffer_size = 20M
read_buffer = 2M
write_buffer = 2M

[mysqlhotcopy]
interactive-timeout

[mysqldump]
quick
max_allowed_packet = 16M

[mysqld_safe]

cd /usr/local/mysql
scripts/mysql_install_db --user=mysql
chmod +x /etc/rc.d/init.d/mysqld
/etc/init.d/mysqld start
masterA上:
mysql> grant replication slave on *.* to ‘repl‘@‘192.168.10.12‘ identified by ‘123456‘;
mysql> flush privileges;
masterB上:
mysql> grant replication slave on *.* to ‘repl‘@‘192.168.10.11‘ identified by ‘123456‘;
mysql> flush privileges;
masterA上:

mysql> show master status;

+------------------+----------+--------------+------------------+-------------------+

| File             | Position | Binlog_Do_DB | Binlog_Ignore_DB | Executed_Gtid_Set |

+------------------+----------+--------------+------------------+-------------------+

| mysql-bin.000003 |      120 |              |                  |                   |

+------------------+----------+--------------+------------------+-------------------+

1 row in set (0.00 sec)

masterB上

mysql> show master status;

+------------------+----------+--------------+------------------+-------------------+

| File             | Position | Binlog_Do_DB | Binlog_Ignore_DB | Executed_Gtid_Set |

+------------------+----------+--------------+------------------+-------------------+

| mysql-bin.000003 |      437 |              |                  |                   |

+------------------+----------+--------------+------------------+-------------------+

1 row in set (0.00 sec)

masterA上:
mysql> change master to master_host=‘192.168.10.12‘,master_port=3306,master_user=‘repl‘,master_password=‘123456‘,master_log_file=‘mysql-bin.000003‘,master_log_pos=437;

mysql> start slave;

mysql> show slave status\G;
显示有如下状态则正常:
Slave_IO_Running: Yes

Slave_SQL_Running: Yes
masterB上:
#本人是测试环境,可以保证没数据写入,否则需要的步骤是:先masterA锁表-->masterA备份数据-->masterA解锁表 -->masterB导入数据-->masterB设置主从-->查看主从
mysql> change master to master_host=‘192.168.10.11‘,master_port=3306,master_user=‘repl‘,master_password=‘123456‘,master_log_file=‘mysql-bin.000003‘,master_log_pos=120;

start slave;

mysql> show slave status\G;
显示有如下状态则正常:
Slave_IO_Running: Yes

Slave_SQL_Running: Yes

mysql> show databases;

+--------------------+

| Database           |

+--------------------+

| information_schema |

| mysql              |

| performance_schema |

| test               |

+--------------------+

4 rows in set (0.00 sec)

mysql> create database test01;

Query OK, 1 row affected (0.00 sec)

mysql> show databases;

+--------------------+

| Database           |

+--------------------+

| information_schema |

| mysql              |

| performance_schema |

| test               |

| test01             |

+--------------------+

5 rows in set (0.00 sec)

mysql> quit

Bye

[root@masterA data]#


mysql> show databases;

+--------------------+

| Database           |

+--------------------+

| information_schema |

| mysql              |

| performance_schema |

| test               |

| test01             |

+--------------------+

5 rows in set (0.00 sec)

mysql> quit

Bye

[root@masterB data]#

masterA和masterB分别执行如下命令:

mysql> stop slave;

Query OK, 0 rows affected (0.00 sec)

mysql> change master to MASTER_AUTO_POSITION=1;

Query OK, 0 rows affected (0.01 sec)

mysql> start slave;

Query OK, 0 rows affected (0.00 sec)

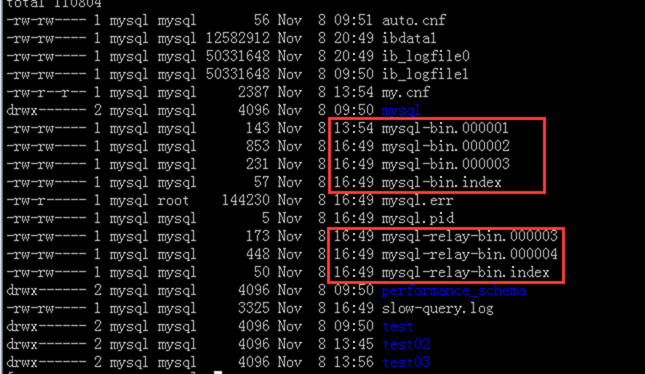
一种主从报错折腾了我半天:
Last_IO_Errno: 1236
Last_IO_Error: Got fatal error 1236 from master when reading data from binary log: ‘Could not open log file‘
后面修改主从同步相关 参数,确认原因是my.cnf增加了如下参数:
log-bin = mysql-bin
relay-log = mysql-bin

从正常主主同步时的二进制日志文件显示,有2套二进制日志。因此推断上面2个参数导致不能产生2套二进制文件,故导致二进制文件错乱和丢失。
MySQL主主
标签:vip 5.6 event 更新 问题 3.1 hotcopy log mini