时间:2021-07-01 10:21:17 帮助过:42人阅读

在css中,clip属性只能在设置了绝对定位:“position:absolute”或者固定定位:“position:fixed”属性的元素上起作用。它对设置了相对定位:“position:relative”或静态定位:“position:static”属性的元素上没有任何影响。
使用时clip,我们可以指定向内的偏移量,以指定要剪切的元素边缘的区域。
clip属性仅接受一个形状函数,即rect()函数,作为值。下面我们来看看rect()函数基本语法:
rect(< top >,< right >,< bottom >,< left >);
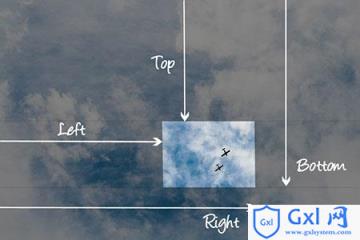
我们可以看出,rect()函数采用四个参数,这些参数分别是从元素的顶部和左侧边界向内偏移的偏移量。
顶部和底部值都定义来自顶部边界的偏移,而左边和右边值都定义来自左边边界的偏移。

显示剪辑属性偏移量
裁剪区域或在裁剪元素后保持可见的元素部分由rect()函数的偏移量定义,rect()函数可以创建的矩形形状,如上图所示。
元素的剪切区域会把剪切区域之外的元素的任何方面(例如,内容,子项,背景,边框,文本修饰,轮廓等)剪切掉。已剪切的内容不会导致溢出。
clip属性的使用
基本语法:
clip: auto | rect() | inherit;
rect() 函数的语法:
rect(<top>, <right>, <bottom>, <left>)
<top>, <right>, <bottom>, <left>里都是使用长度值来设置的
说明:
1、auto:该元素未被剪裁。
2、inherit:元素从其父级继承其clip值。
3、rect():指定矩形剪切区域。也就是说,它指定在剪切元素后的可见的元素区域是矩形的。
rect()函数有四个参数。这些参数可以是逗号分隔或空格分隔。
rect(< top >,< right >,< bottom >,< left >)/ *标准语法* /
/* 要么 */
rect(< top >  < right >  < bottom >  < left >)/ *向后兼容语法* /
rect()函数还接受关键字auto作为偏移量。值auto表示裁剪区域的给定边缘将与元素的边界框的边缘相同。
rect()函数的参数:顶部,右侧,底部和左侧偏移也接受负长度值。
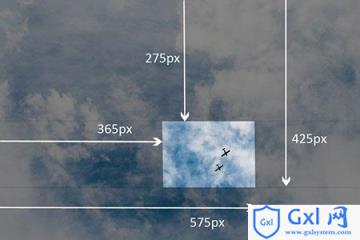
例:元素的部分垂直地保持在“40px”和“150px”之间,并且水平地保持在“80px”和“260px”之间
img {
   clip:rect(275px,575px,425px,365px);
}
效果图:

显示剪切元素后的可见区域示例
在Internet Explorer 4到7支持较旧的空格分隔语法,因此为了确保剪辑在这些浏览器中有效,我们可以两种方法都写上:
img {
    clip:rect(40px 260px 150px 80px); / * IE 4到7 * /
    clip:rect(40px,260px,150px,80px); / * IE8 +和其他浏览器* /
}
clip属性的示例:
html代码:
<div class="container">
  <p>
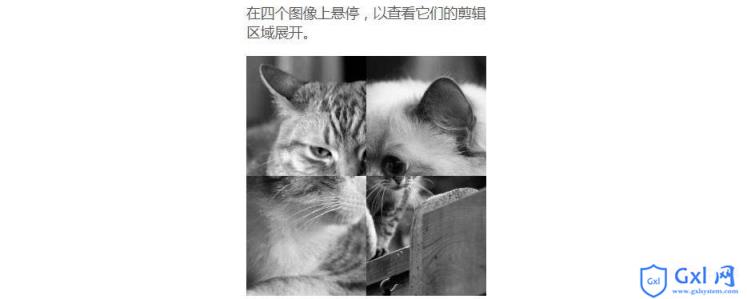
   在四个图像上悬停,以查看它们的剪辑区域展开。
  </p>
  <div class="element element-1">
    <img src="images/cat-1.jpg" alt="">
  </div>
  <div class="element element-2">
    <img src="images/cat-4.jpg" alt="">
  </div>
  <div class="element element-3">
    <img src="images/cat-3.jpg" alt="">
  </div>
  <div class="element element-4">
    <img src="images/cat-2.jpg" alt="">
  </div>
</div>
css代码:
.container {
  margin: 40px auto;
  width: 300px;
  position: relative;
}

.element {
  width: 300px;
  height: 300px;
  z-index: 0;
  position: absolute;
  -webkit-transition: clip .4s ease-in-out, z-index .2s linear .4s;
  transition: clip .4s ease-in-out, z-index .2s linear .4s;
}

img {
  max-width: 100%;
}

.element-1 {
  background-color: #2c3e50;
  clip: rect(0px, 150px, 150px, 0px);
}

.element-2 {
  background-color: #f39c12;
  clip: rect(0px, 300px, 150px, 150px);
}

.element-3 {
  background-color: #16a085;
  clip: rect(150px, 150px, 300px, 0px);
}

.element-4 {
  background-color: #8e44ad;
  clip: rect(150px, 300px, 300px, 150px);
}

.element:hover {
  z-index: 1;
  -webkit-transition: clip .4s ease-in-out .2s, z-index .2s linear;
  transition: clip .4s ease-in-out .2s, z-index .2s linear;
  clip: rect(0px, 300px, 300px, 0px);
}
效果图:

浏览器支持度
所有主流浏览器都支持clip属性:Chrome,Firefox,Safari,Opera,Internet Explorer以及Android和iOS。
Internet Explorer版本7回到4支持旧的空格分隔rect()语法。从IE8开始支持标准的逗号分隔语法。
总结:以上就是本篇文章的全部内容,希望能对大家的学习有所帮助。
以上就是css如何剪切元素?clip属性的使用的详细内容,更多请关注Gxl网其它相关文章!