时间:2021-07-01 10:21:17 帮助过:7人阅读
OAuth是一种开发授权的网络标准,全拼为open authorization,即开放式授权,最新的协议版本是2.0。
举个栗子:
有一个"云冲印"的网站,可以将用户储存在Google的照片,冲印出来。用户为了使用该服务,必须让"云冲印"读取自己储存在Google上的照片。
传统方法是,用户将自己的Google用户名和密码,告诉"云冲印",后者就可以读取用户的照片了。这样的做法有以下几个严重的缺点。
所以OAuth就诞生了!
登录层提供令牌(token)的生成,其中token包括:有效期、权限范围。客户端拿到token去访问受限资源。
OAuth授权模式
OAuth有四种授权模式,分别为:
1、授权码模式
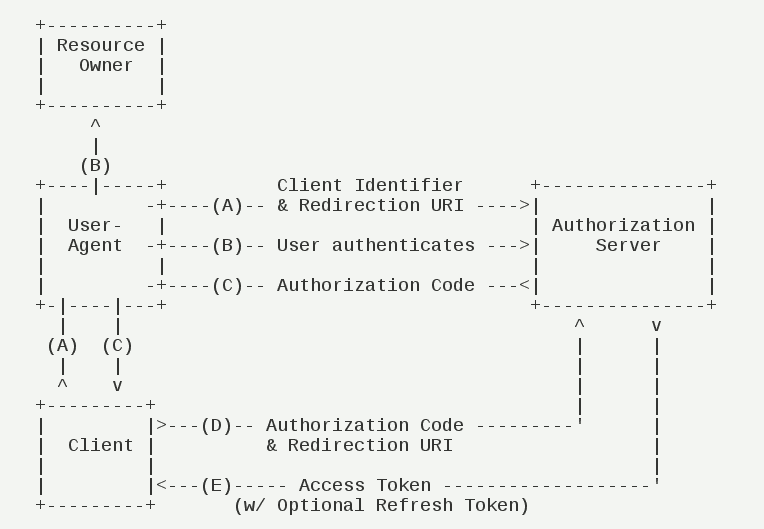
授权码模式是最为严密的授权模式,整体流程为:浏览器携带必要信息至授权页面,正常登录成功后,返回一个code(授权码),客户端拿到code后在后台获取拿code换取token。


2、密码模式
密码模式,简单地理解即为使用用户名密码等参数获取access_token,它的步骤如下:

3、refresh_token的应用
refresh_token被用来获取新的access_token和refresh_token,使用方式简单如下:

refresh_token无效:

使用nodejs实现OAuth授权服务
技术栈:
具体可以参考:
https://github.com/Azard/egg-oauth2-server
https://cnodejs.org/topic/592b2aedba8670562a40f60b
1、code grant模式测试及单点登录实现
这里我们构建两个站点,一个是7001端口(授权服务),一个是7002端口(客户端),授权模式为code grant。
首先是客户端登录页:

单击按钮后直接登录:

可以发现,浏览器重定向到授权服务地址,并携带了response_type、client_id、redirect_uri三个参数,登录成功后,浏览器会重定向到redirect_uri指定的地址,即这里的*http://127.0.0.1:7002/auth/redirect*:
如下为授权服务的登录页写法
<form action="/oauth2/authorize?{{query}}" id="form1" name="f" method="post">
  <div class="input_outer">
    <span class="u_user"></span>
    <input name="username" class="text" style="color: #FFFFFF !important" type="text" placeholder="请输入账户">
  </div>
  <div class="input_outer">
    <span class="us_uer"></span>
    <input name="password" class="text" style="color: #FFFFFF !important; position:absolute; z-index:100;"value="" type="password" placeholder="请输入密码">
  </div>
  <div class="mb2"><a class="act-but submit" href="javascript:;" rel="external nofollow" onclick="document.getElementById('form1').submit()" style="color: #FFFFFF">登录</a></div>
</form>
这里的${query}即为客户端登录重定向携带的完整query,然后是/oauth2/authorize路由的写法:
app.all('/oauth2/authorize', app.oAuth2Server.authorize());// 获取授权码
这里调用app.oAuth2Server.authorize()时,插件会自动执行重定向操作,首先是重定向到客户端指定地址,客户端拿到code和state后,再去授权层获取token:
async redirect(){
  // 服务端重定向过来的
  console.log(this.ctx.query)
  const result = await this.ctx.curl('http://127.0.0.1:7001/users/token', {
   dataType: 'json',
   // contentType: 'application/x-www-form-urlencoded', // 默认格式
   method: 'POST',
   timeout: 3000,
   data: {
    grant_type: 'authorization_code',
    code: this.ctx.query.code,
    state: this.ctx.query.state,
    client_id: client_id,
    client_secret: client_secret,
    redirect_uri: redirect_uri,
   }
  });
  this.ctx.body = result.data;
 }
获取到token后正常返回:

2、password grant模式测试
首先使用username、password获取access_token:

用户名或密码错误时返回:

使用token获取授权资源正常返回:

以上内容完整源码参考:https://github.com/caiya/eggjs-oAuth2-server
总结
以上就是本文的全部内容,希望对大家的学习有所帮助,也希望大家多多支持脚本之家。